Yes, You SHOULD Visit Death Valley!

It’s hot.
It’s dry.
There’s little to no life there.
So what could you possibly go to see in Death Valley National Park?

Well for starters, if you visit in the winter like I did, it’s not hot at all! In fact, it’ll be quite chilly in the morning. But the scenery is like something from another planet! Sand dunes, salt flats, badlands hills and rugged mountains.

Here are some of the spots you should consider stopping at in Death Valley.
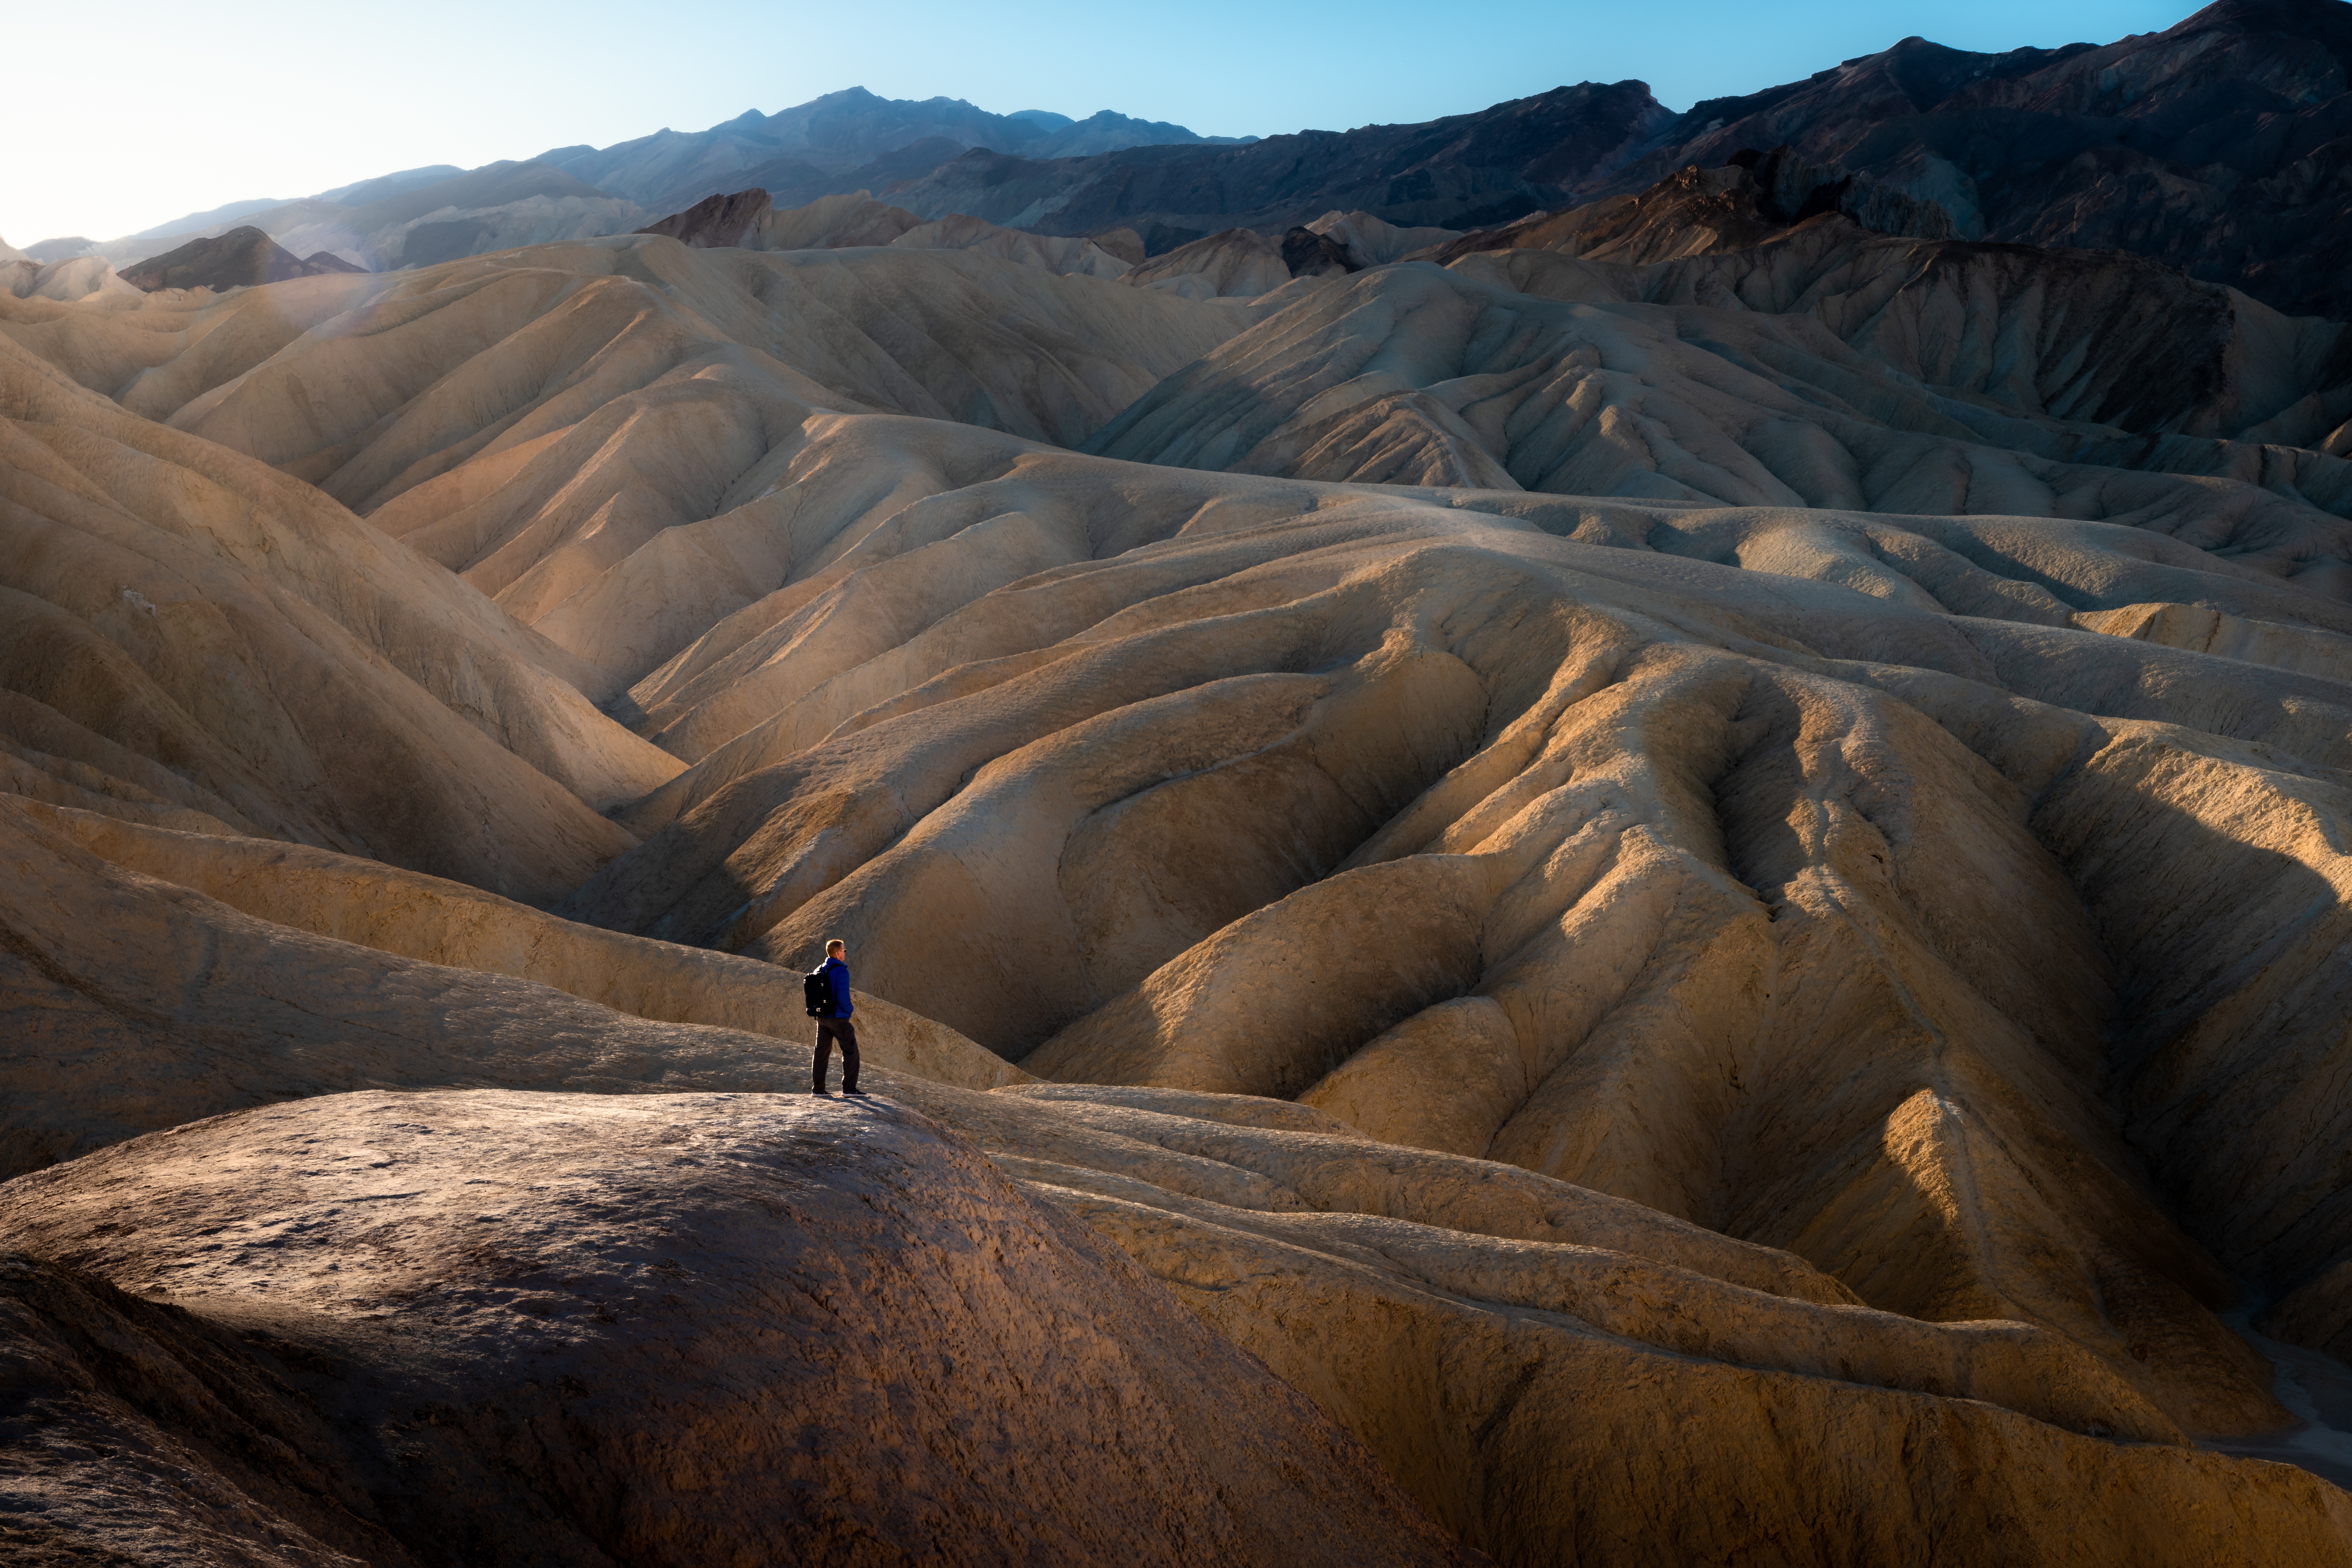
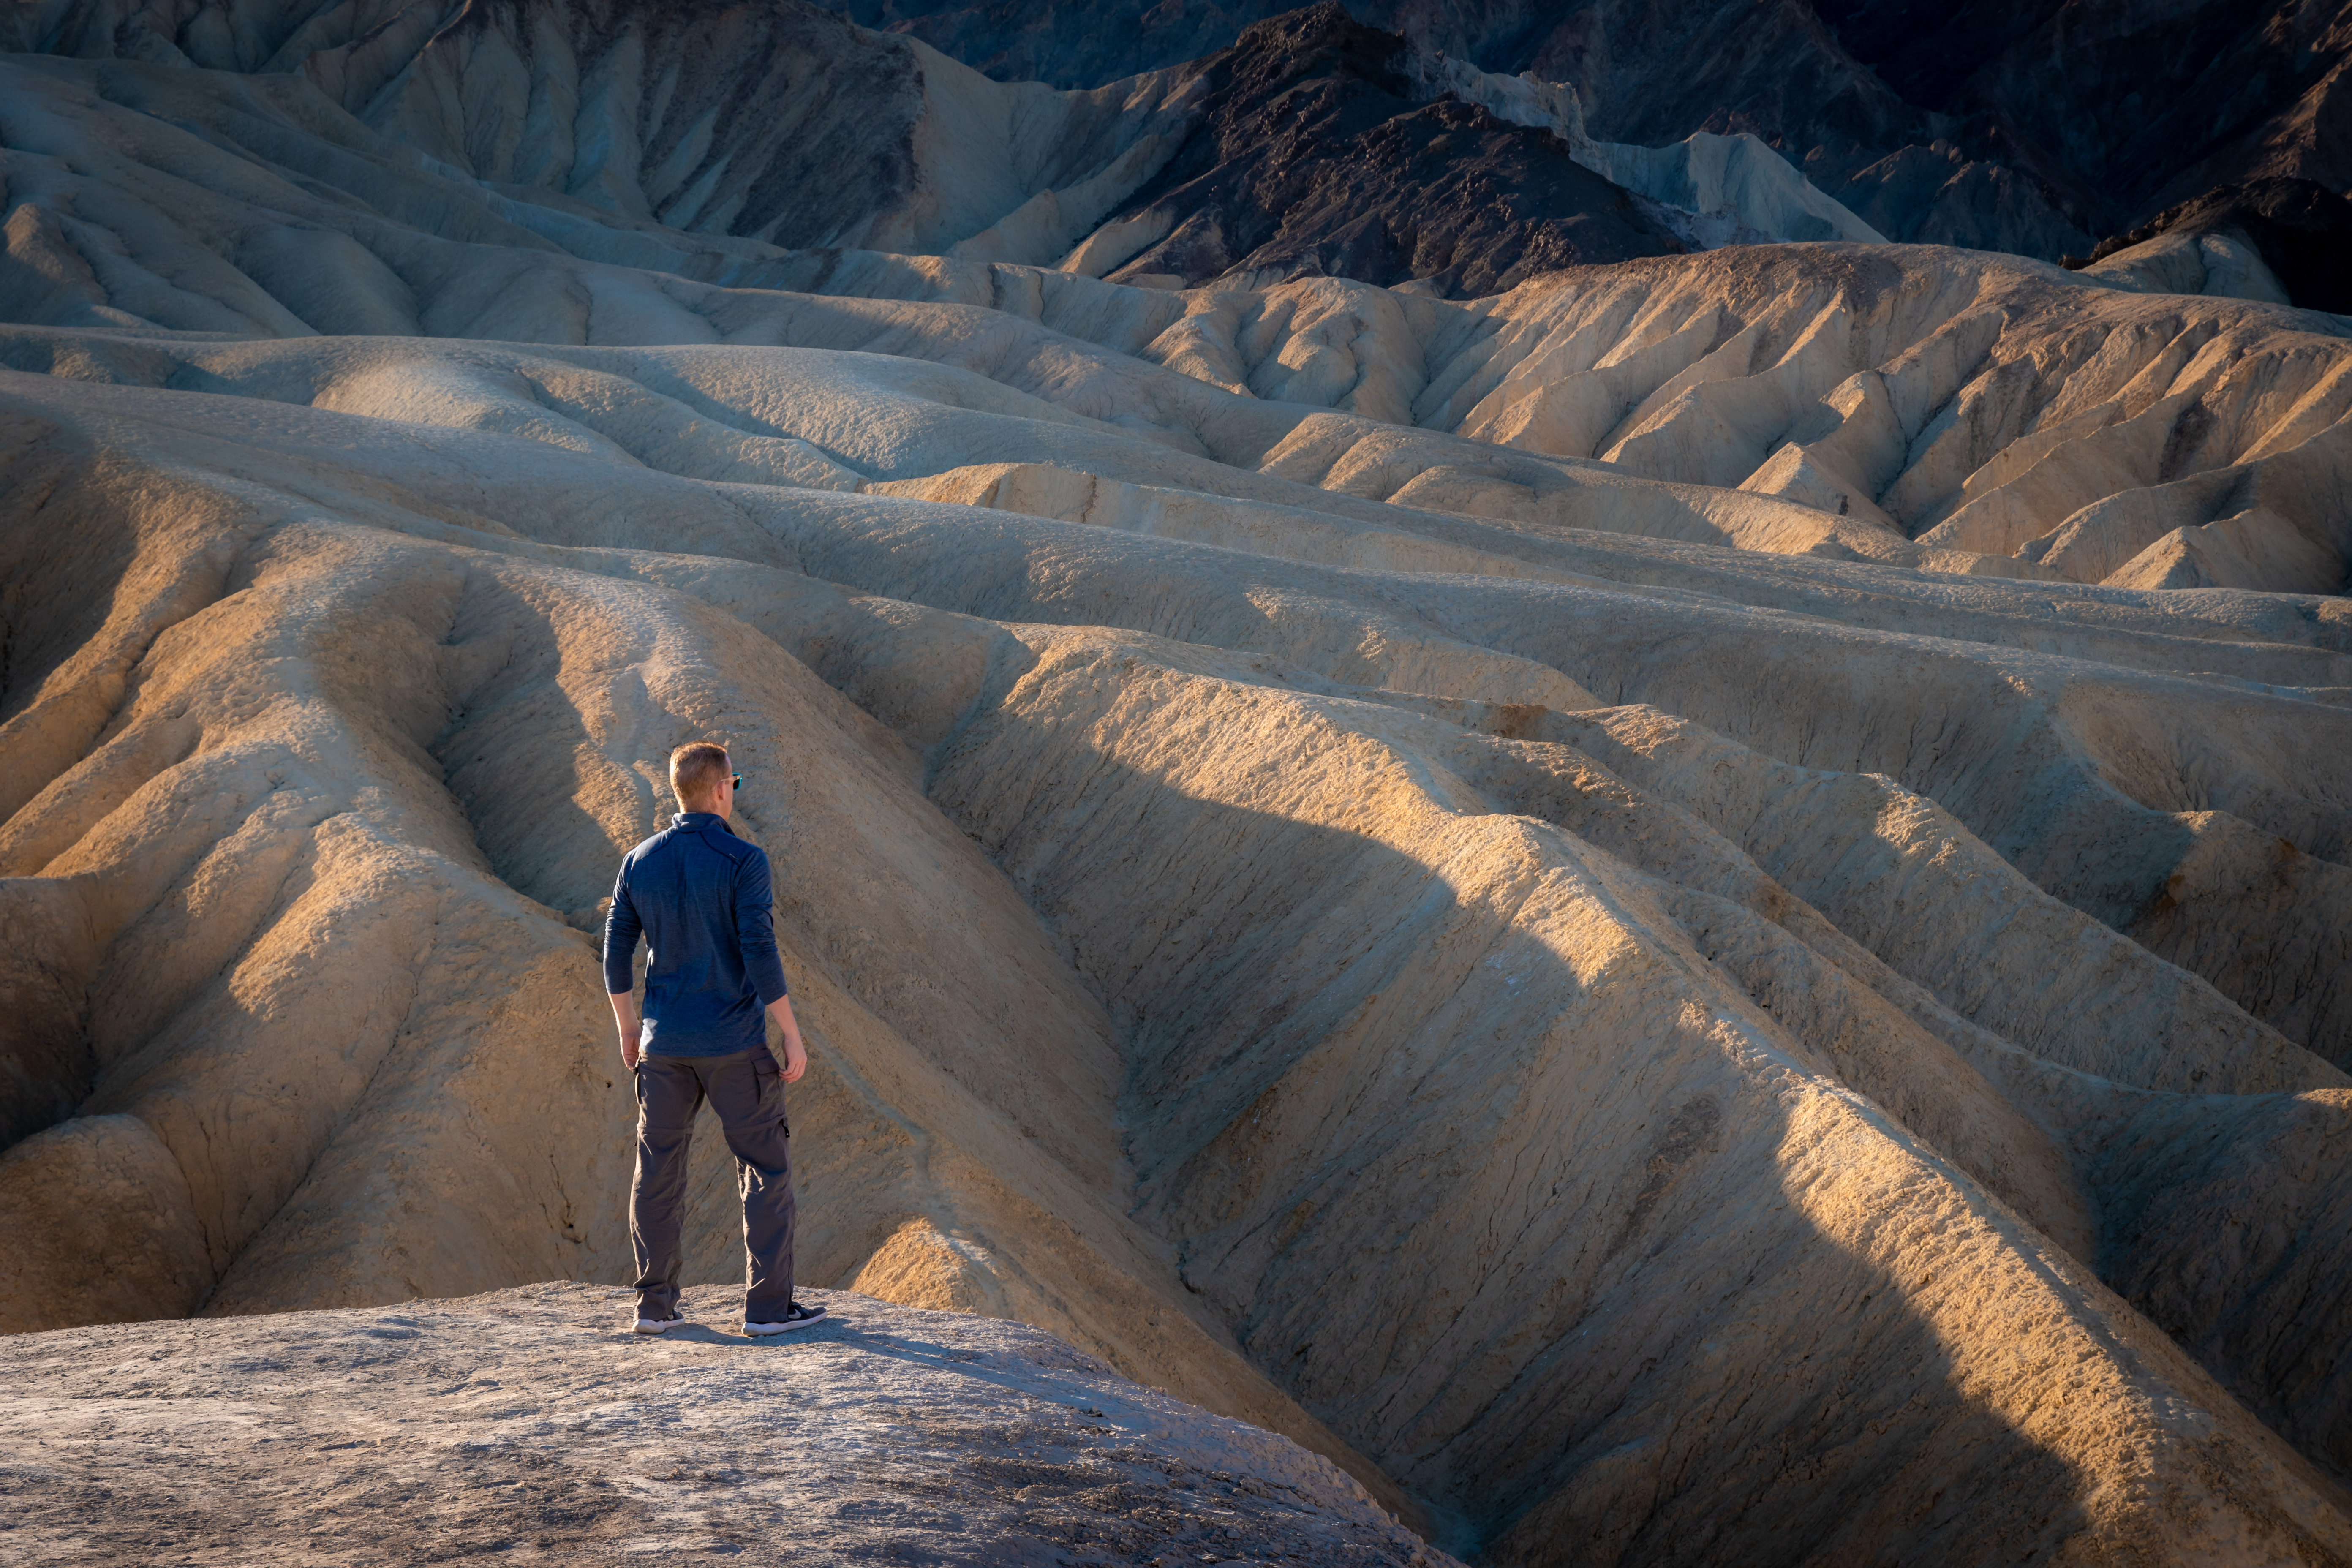
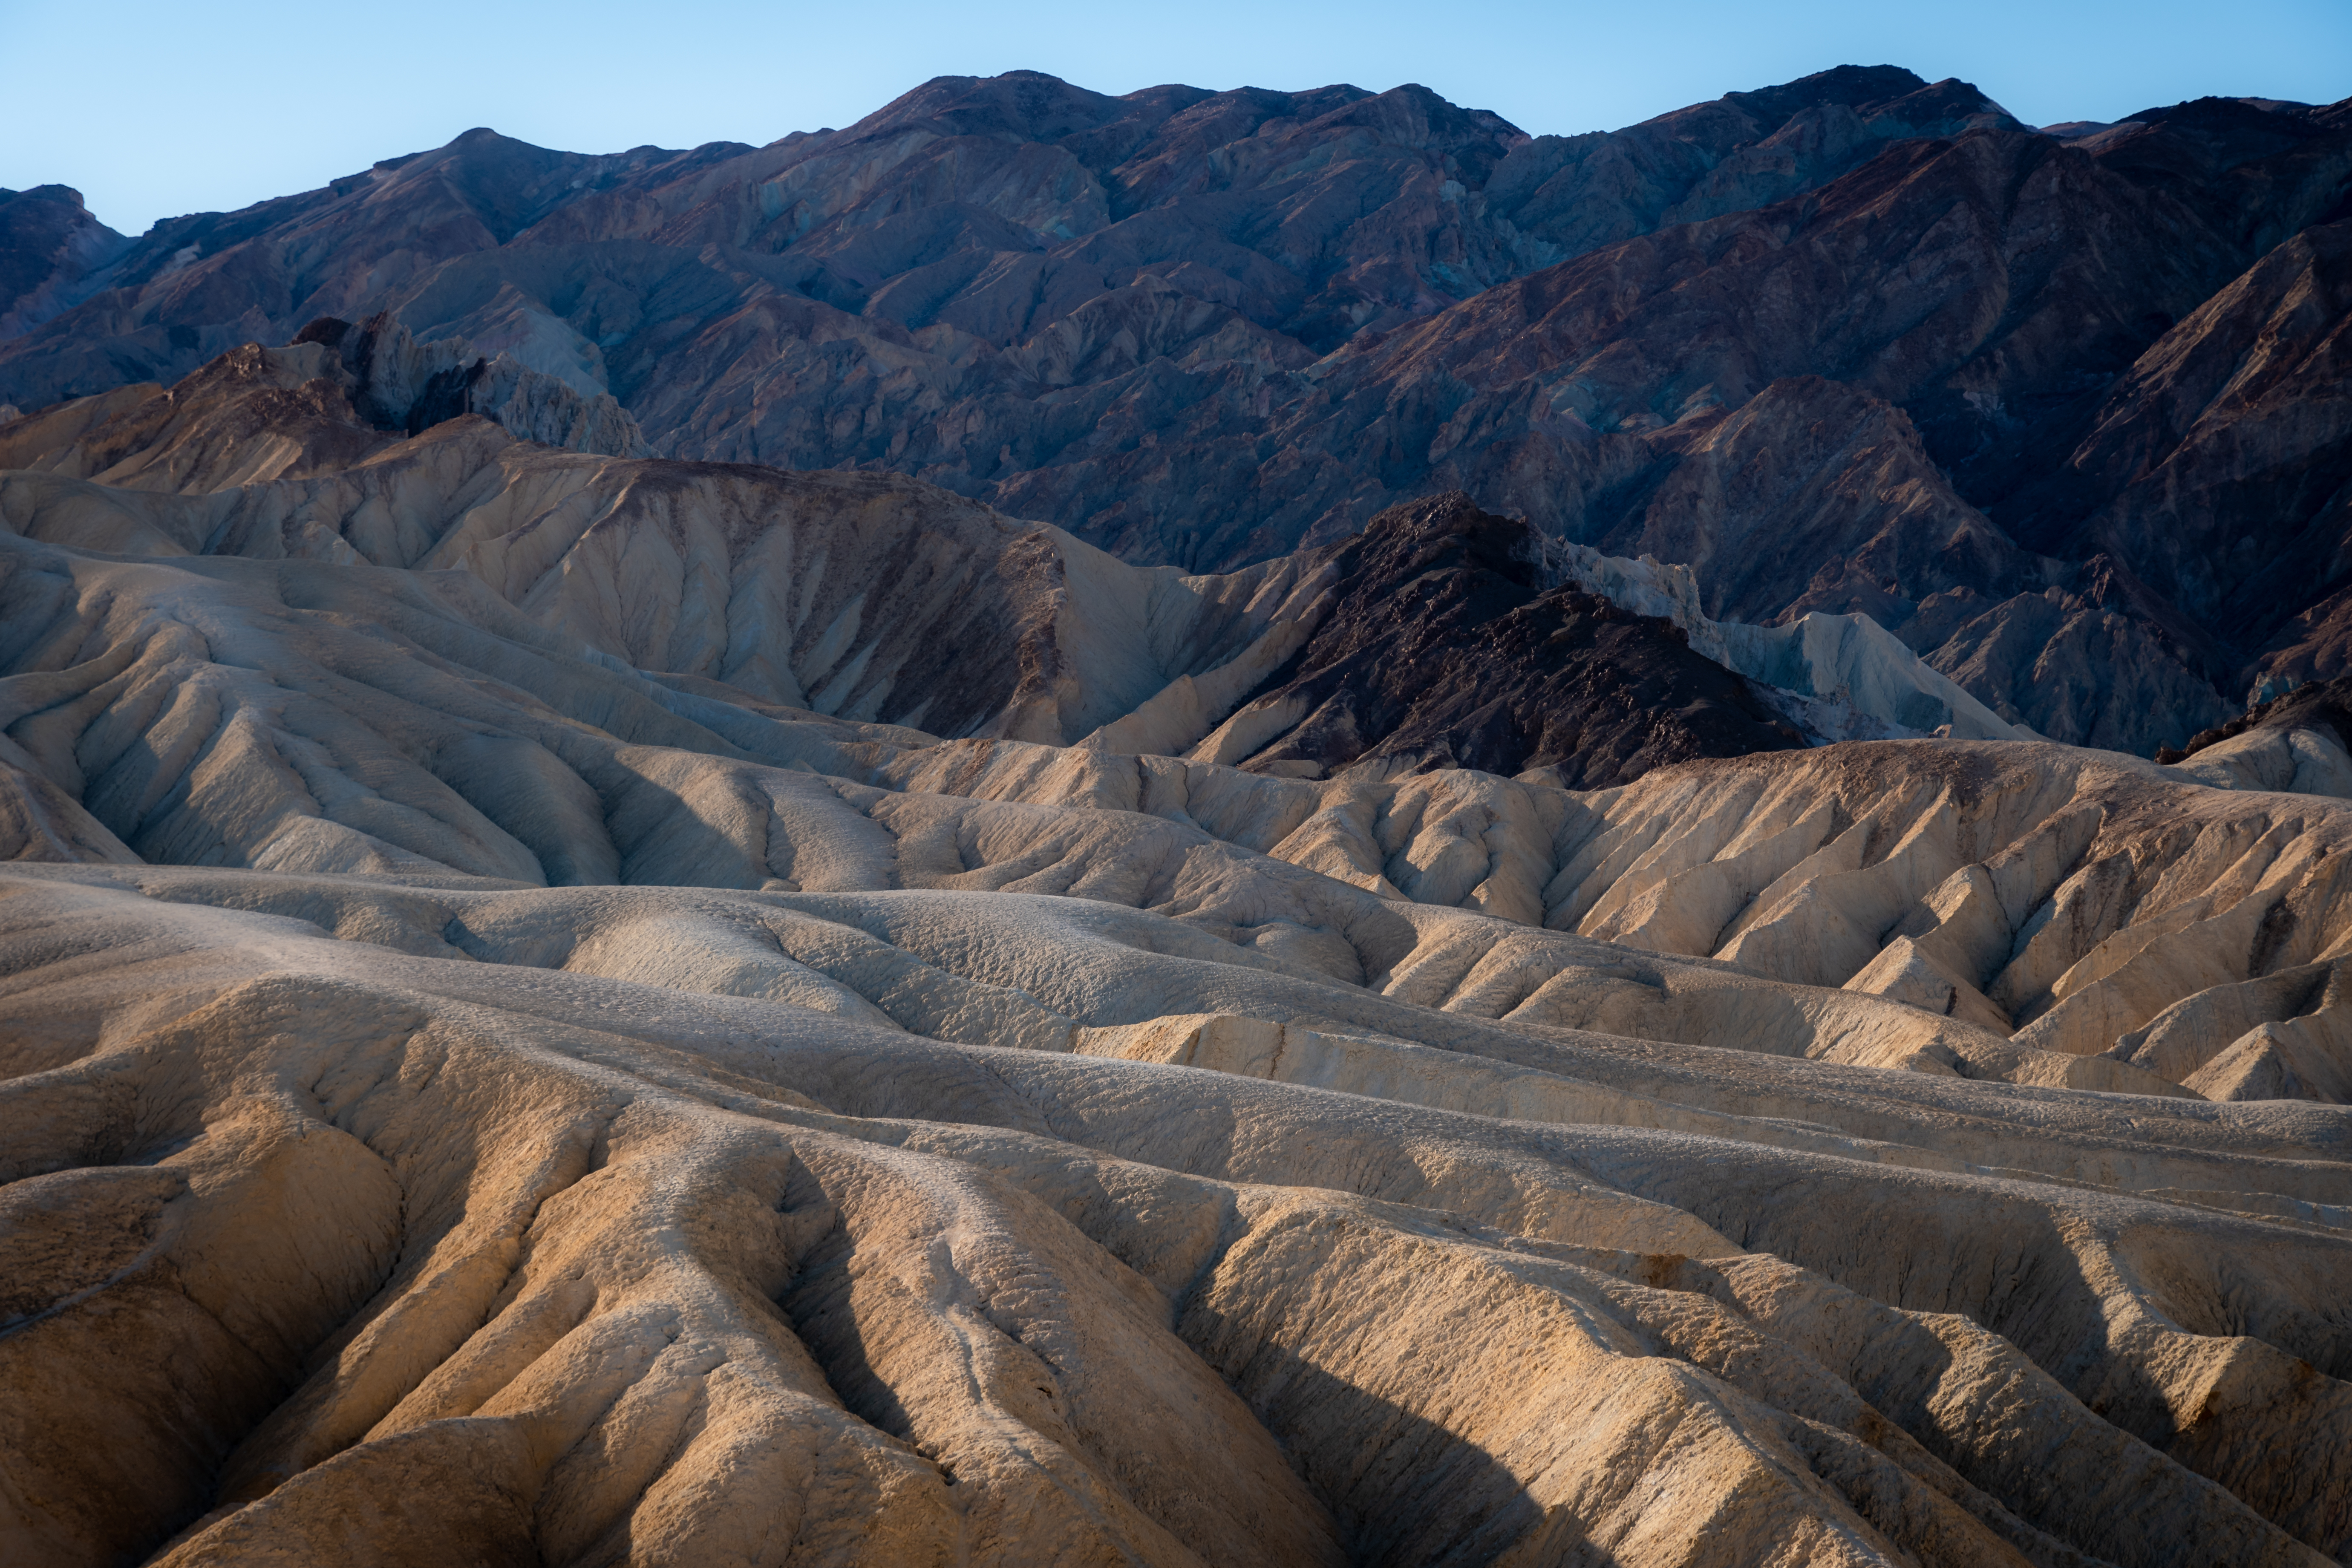
Zabriskie Point

During the low-light hours around sunrise and sunset, these intricate hills really come to life as shadows are cast across them, highlighting their unique layout. It’s a great spot for photos, and you can even hike on the Badlands Loop Trail. The hills were formed from sediment in Furnace Creek Lake, which dried up 5 million years ago. Throw in some erosion, and this is what you’re left with!

I arrived for sunrise, and it was fairly crowded, but after the sun was up, the majority of the people left. In my opinion, they left way too early, as the light hadn’t even hit these badlands yet. The photos above were taken well after sunrise, by about 45-60 minutes.

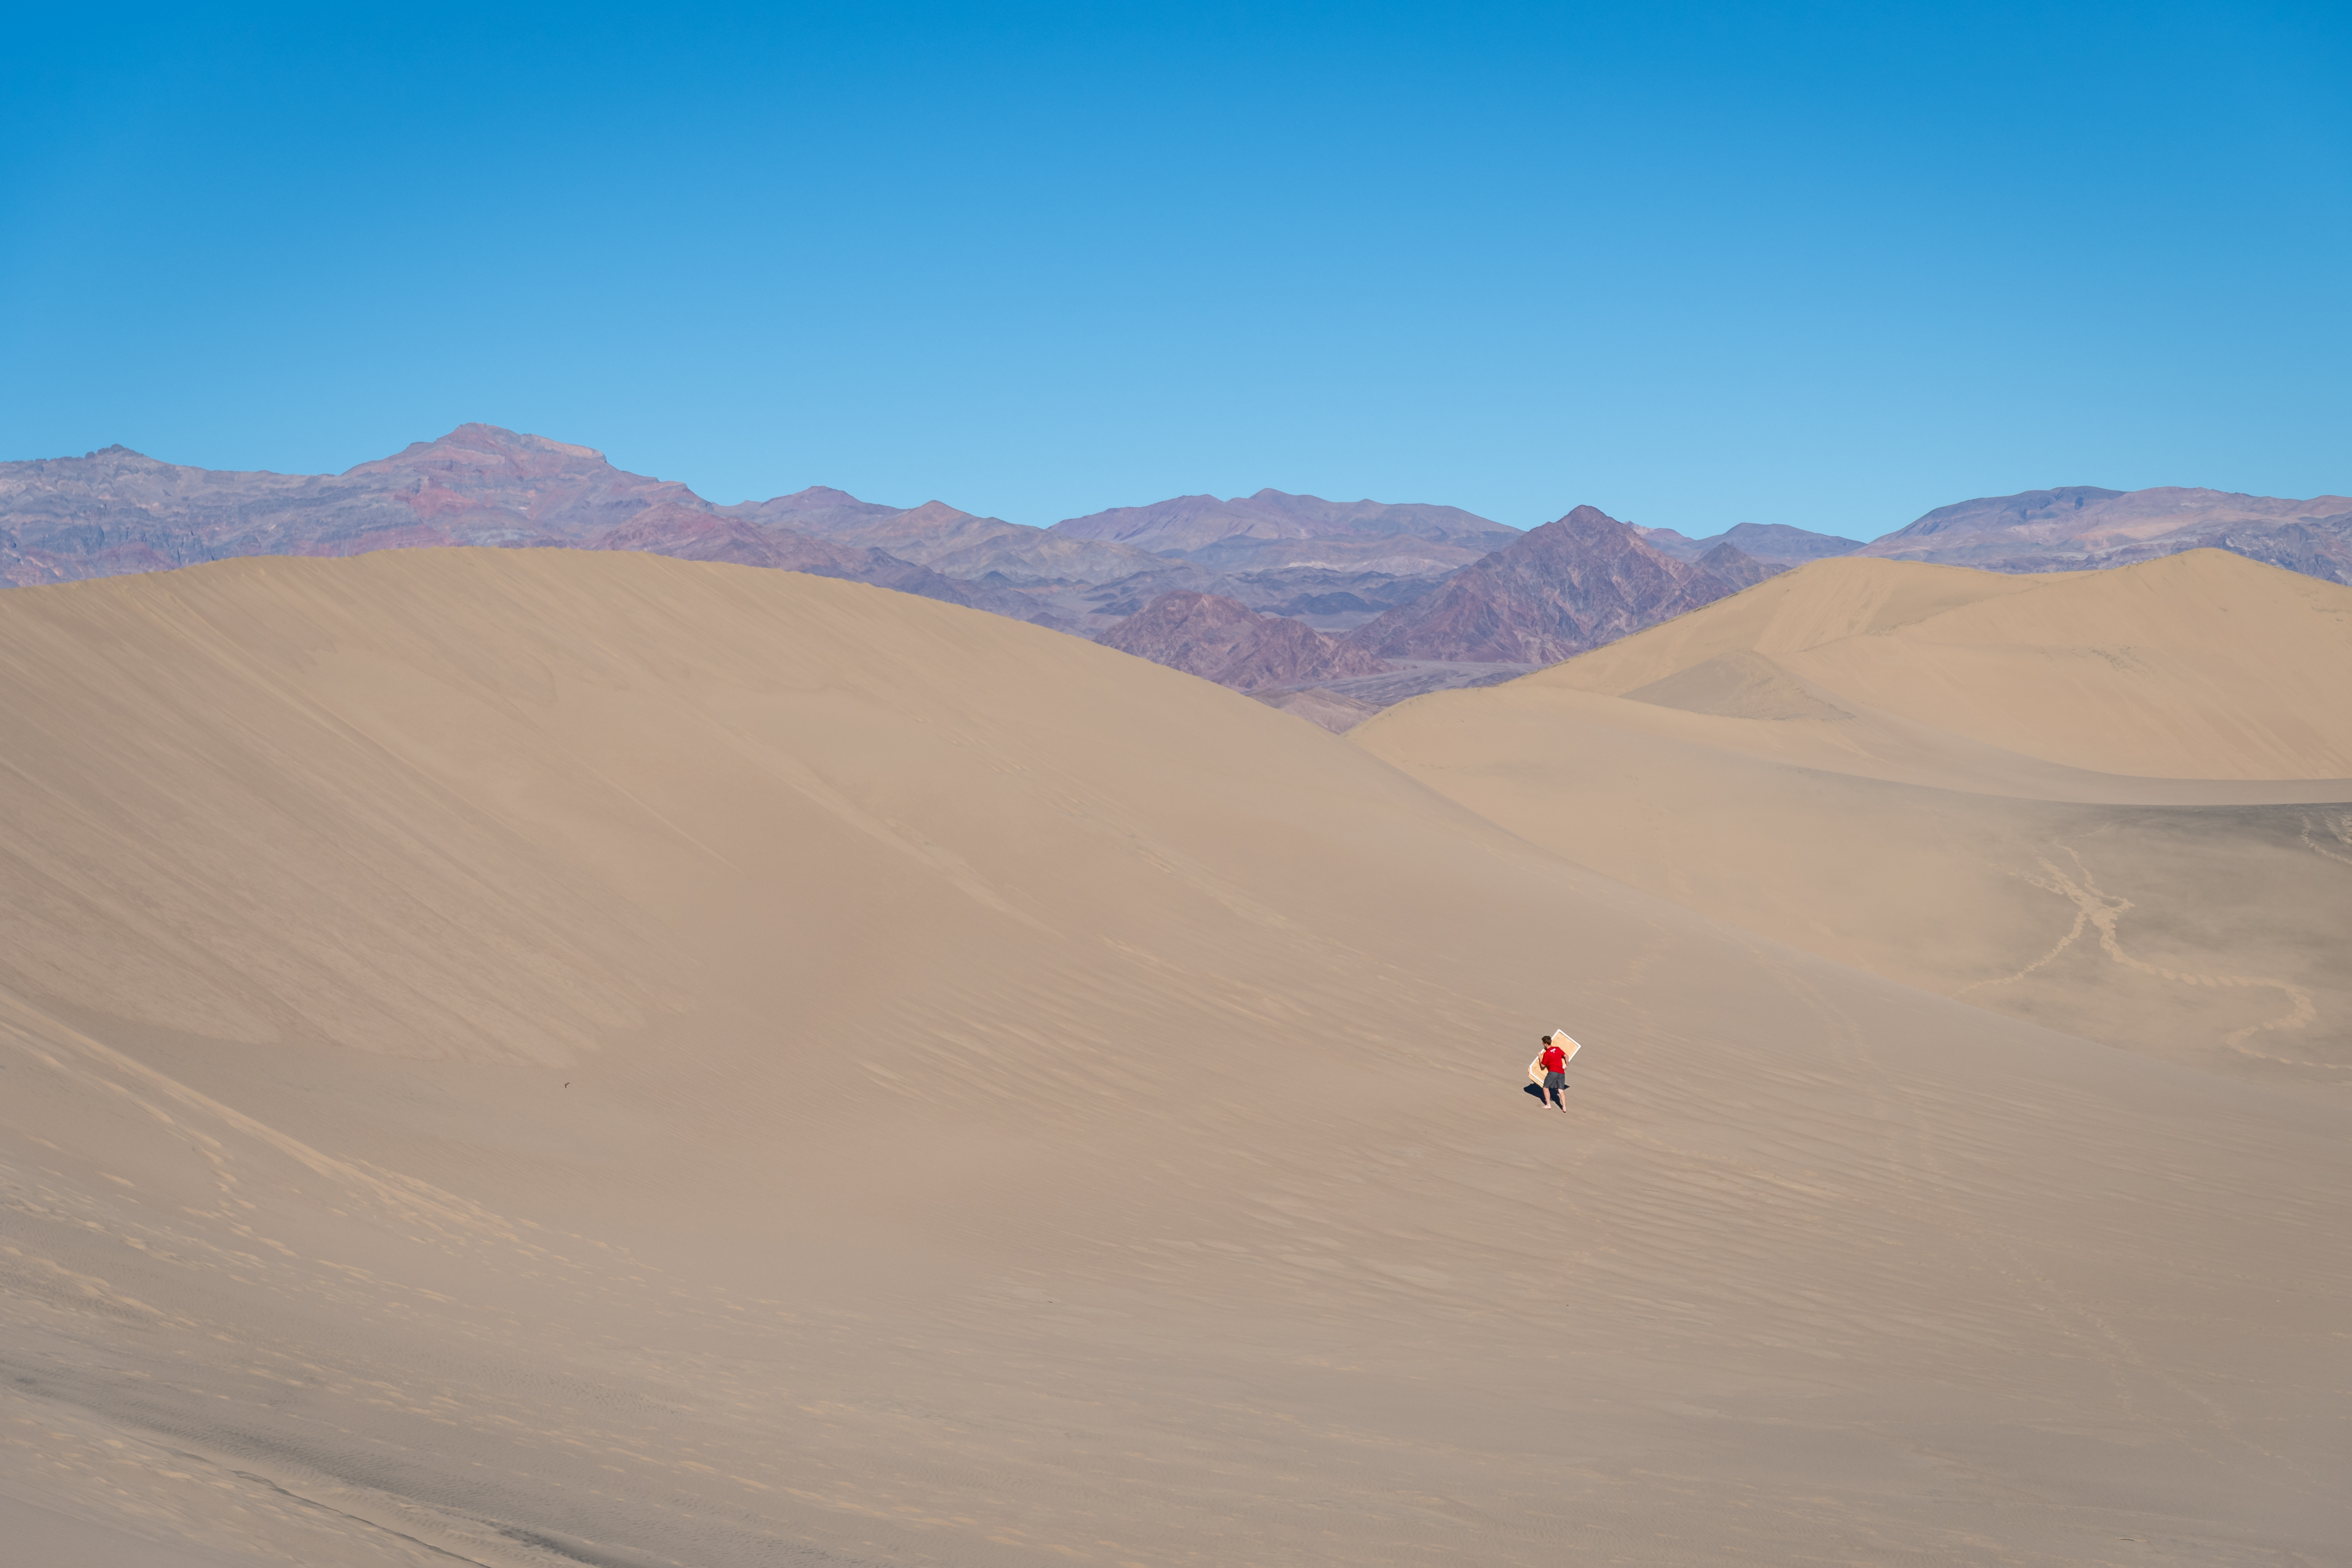
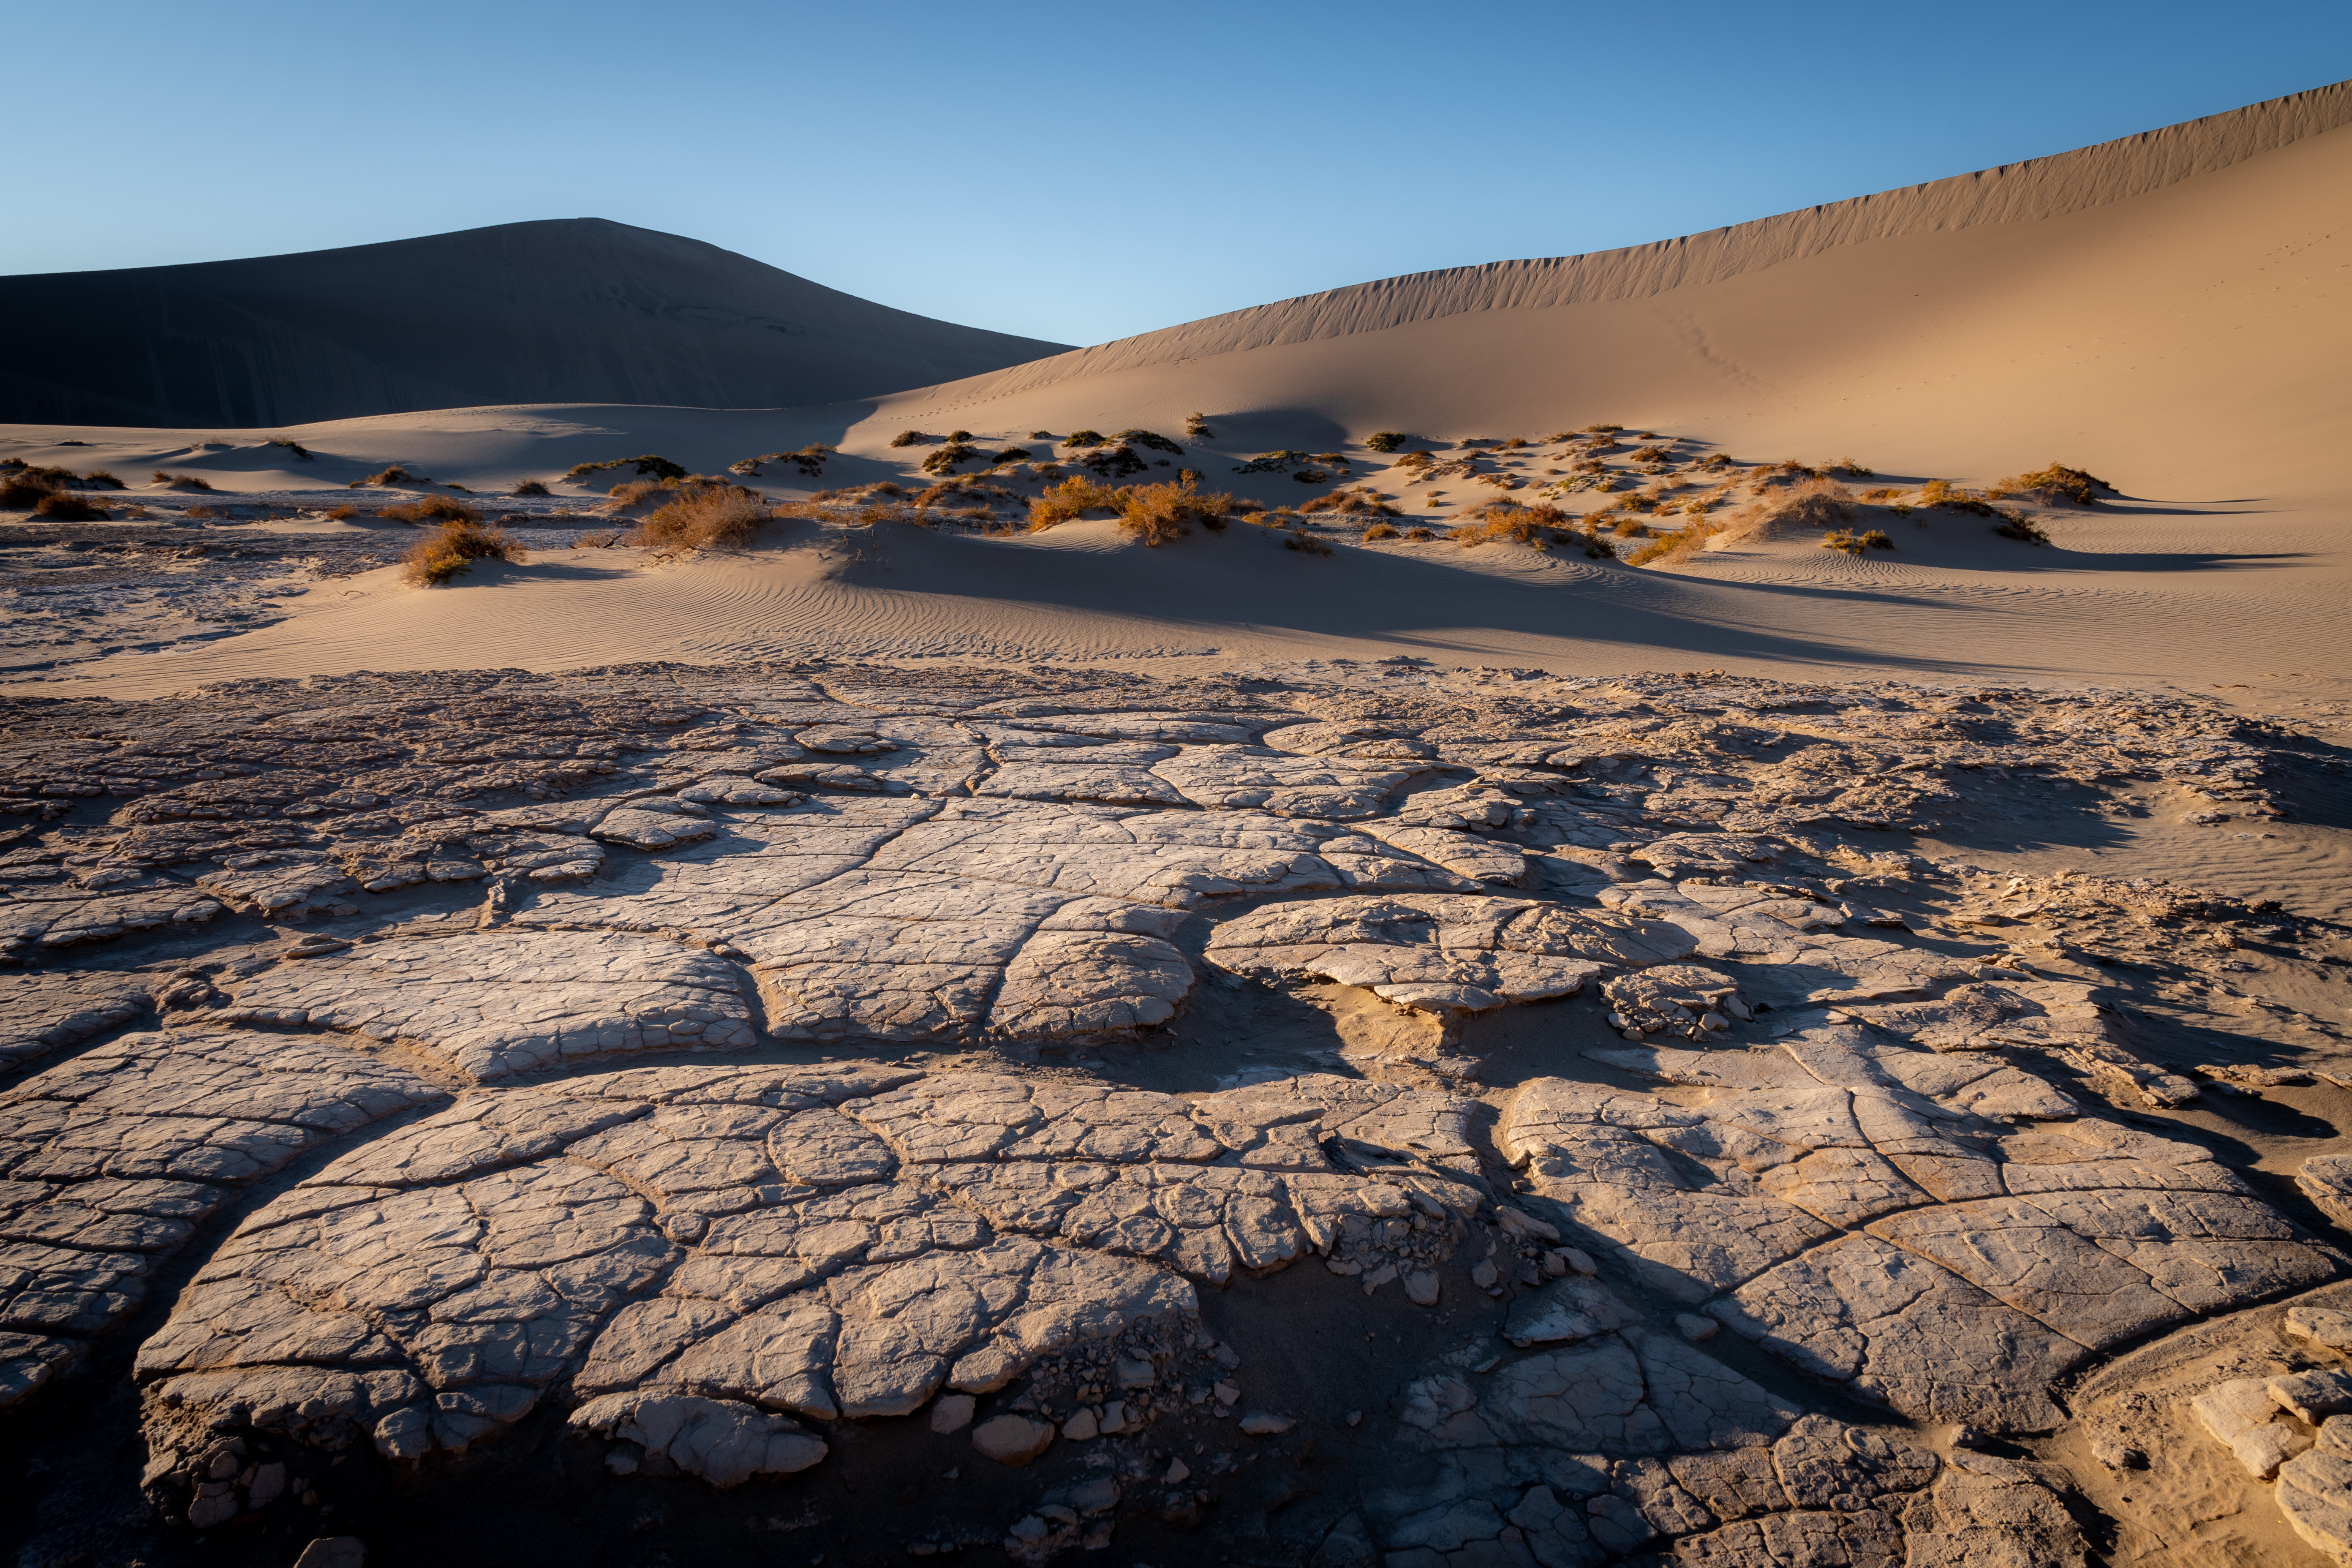
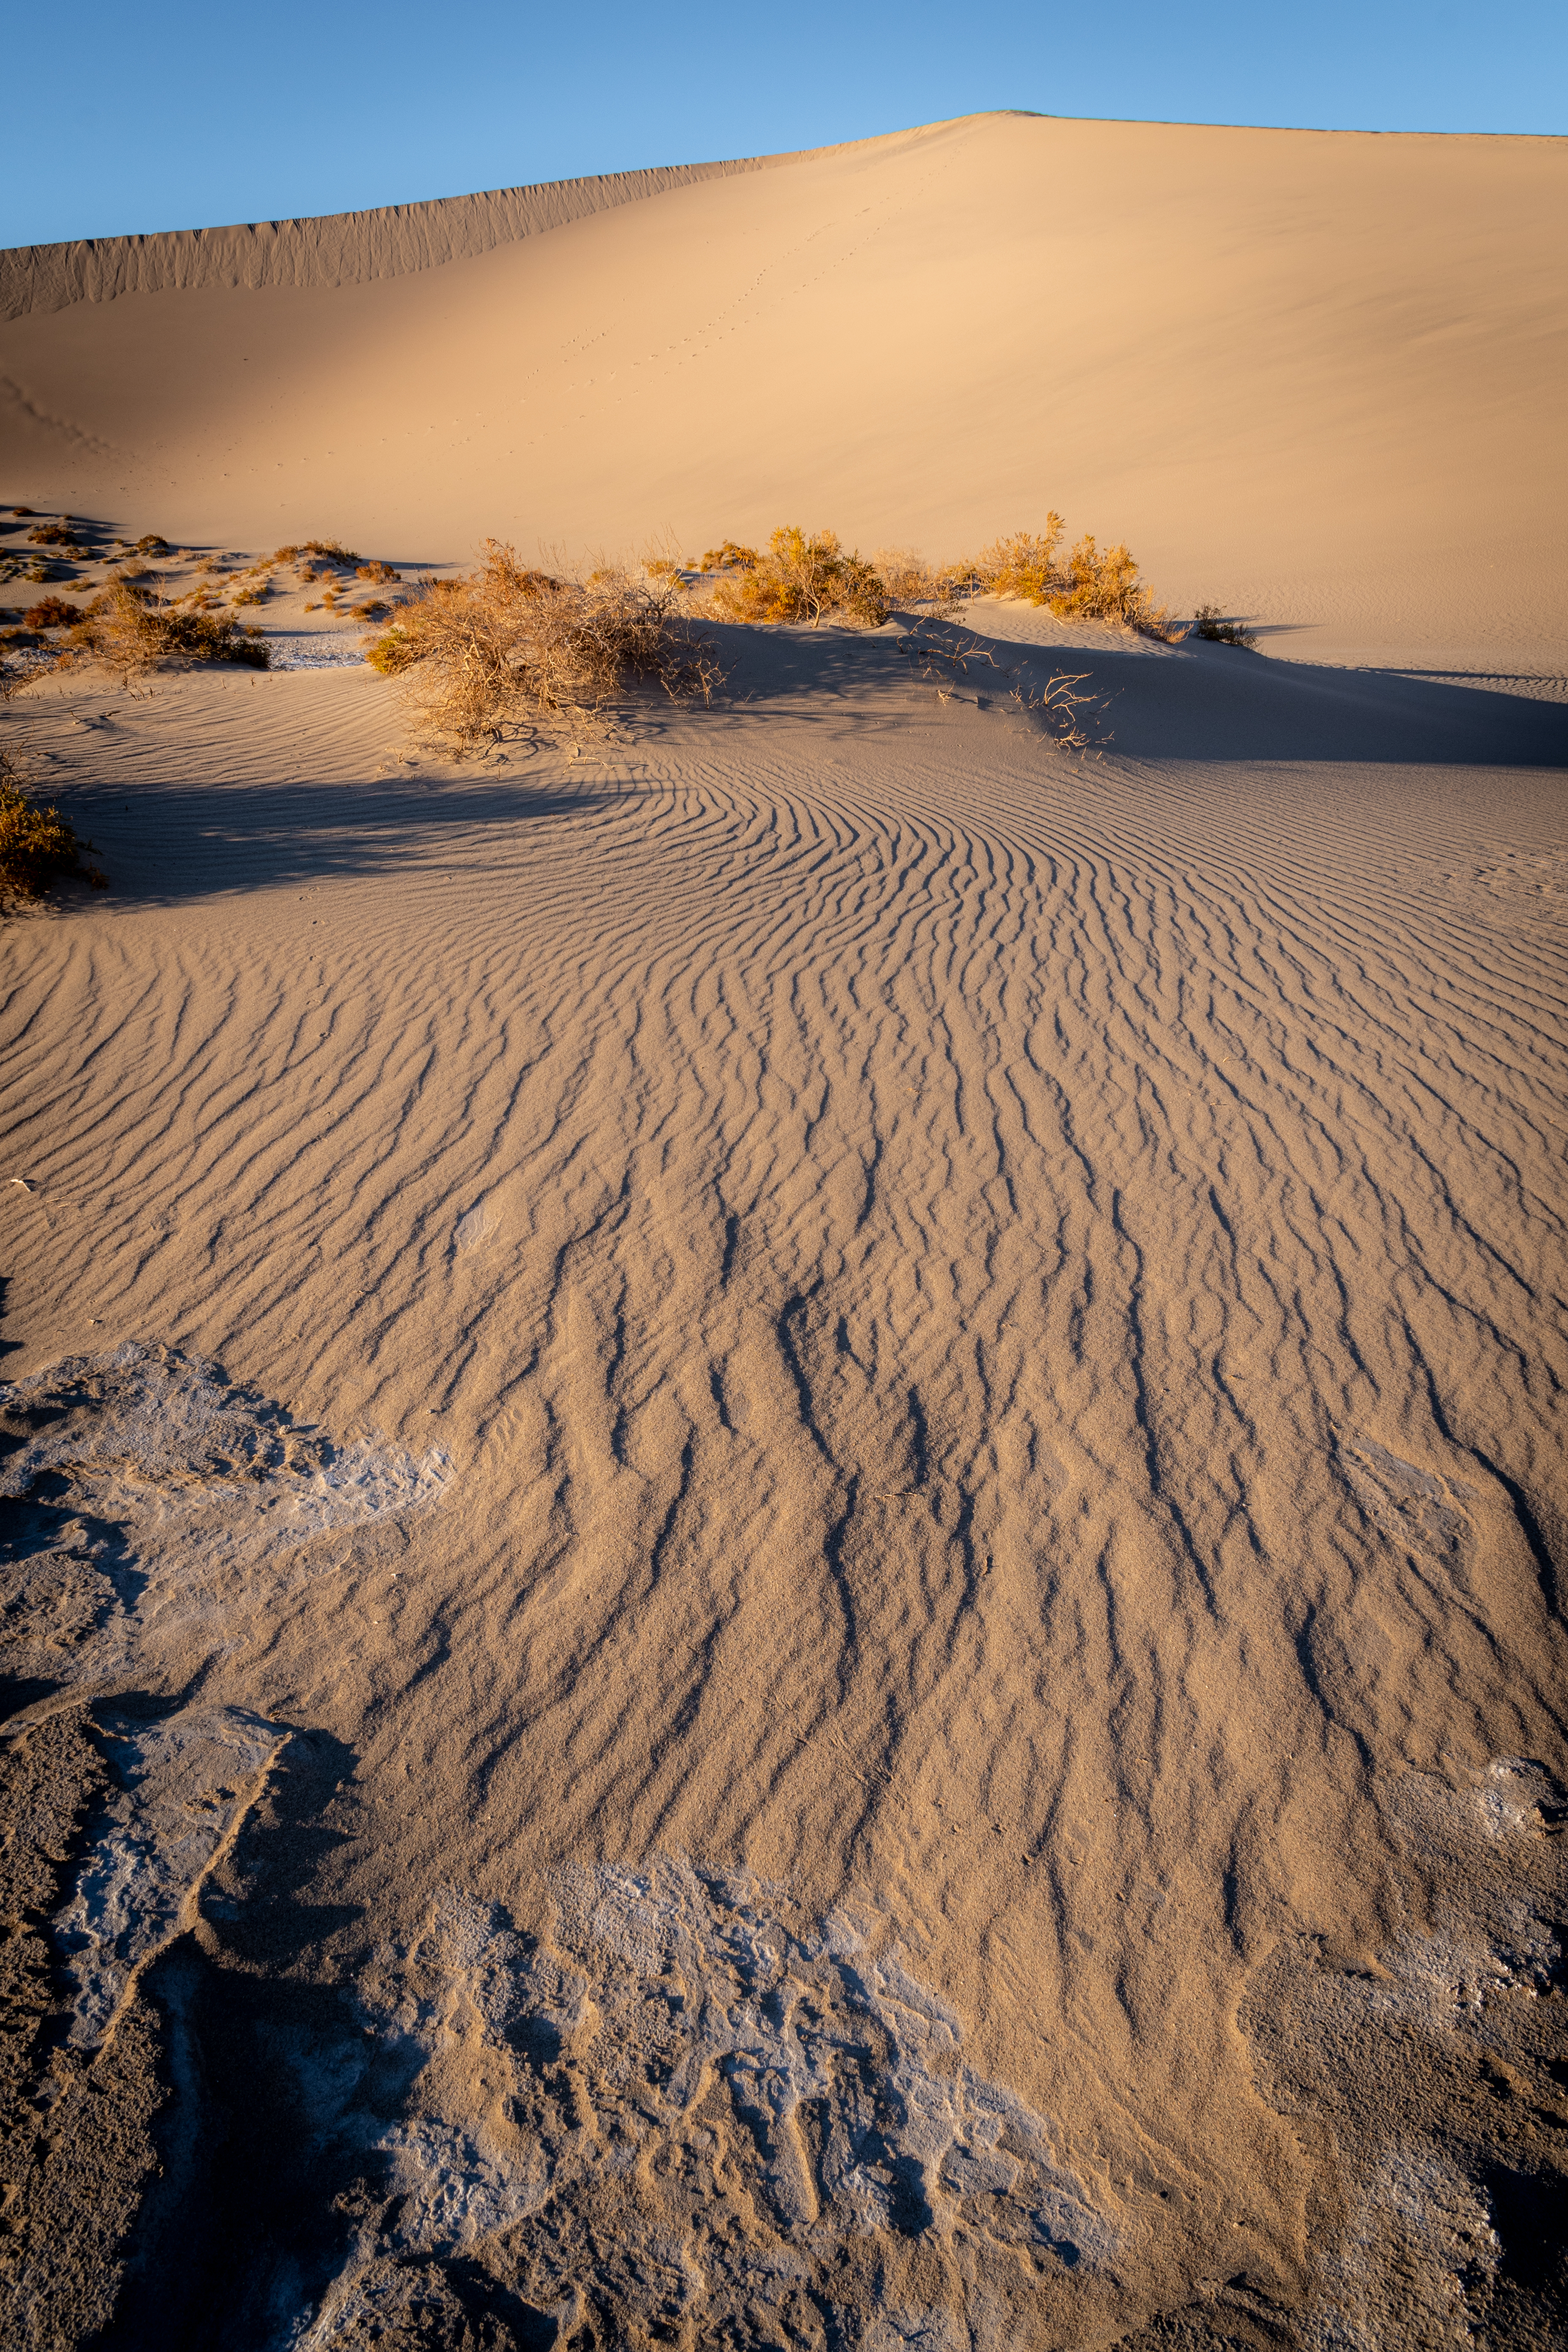
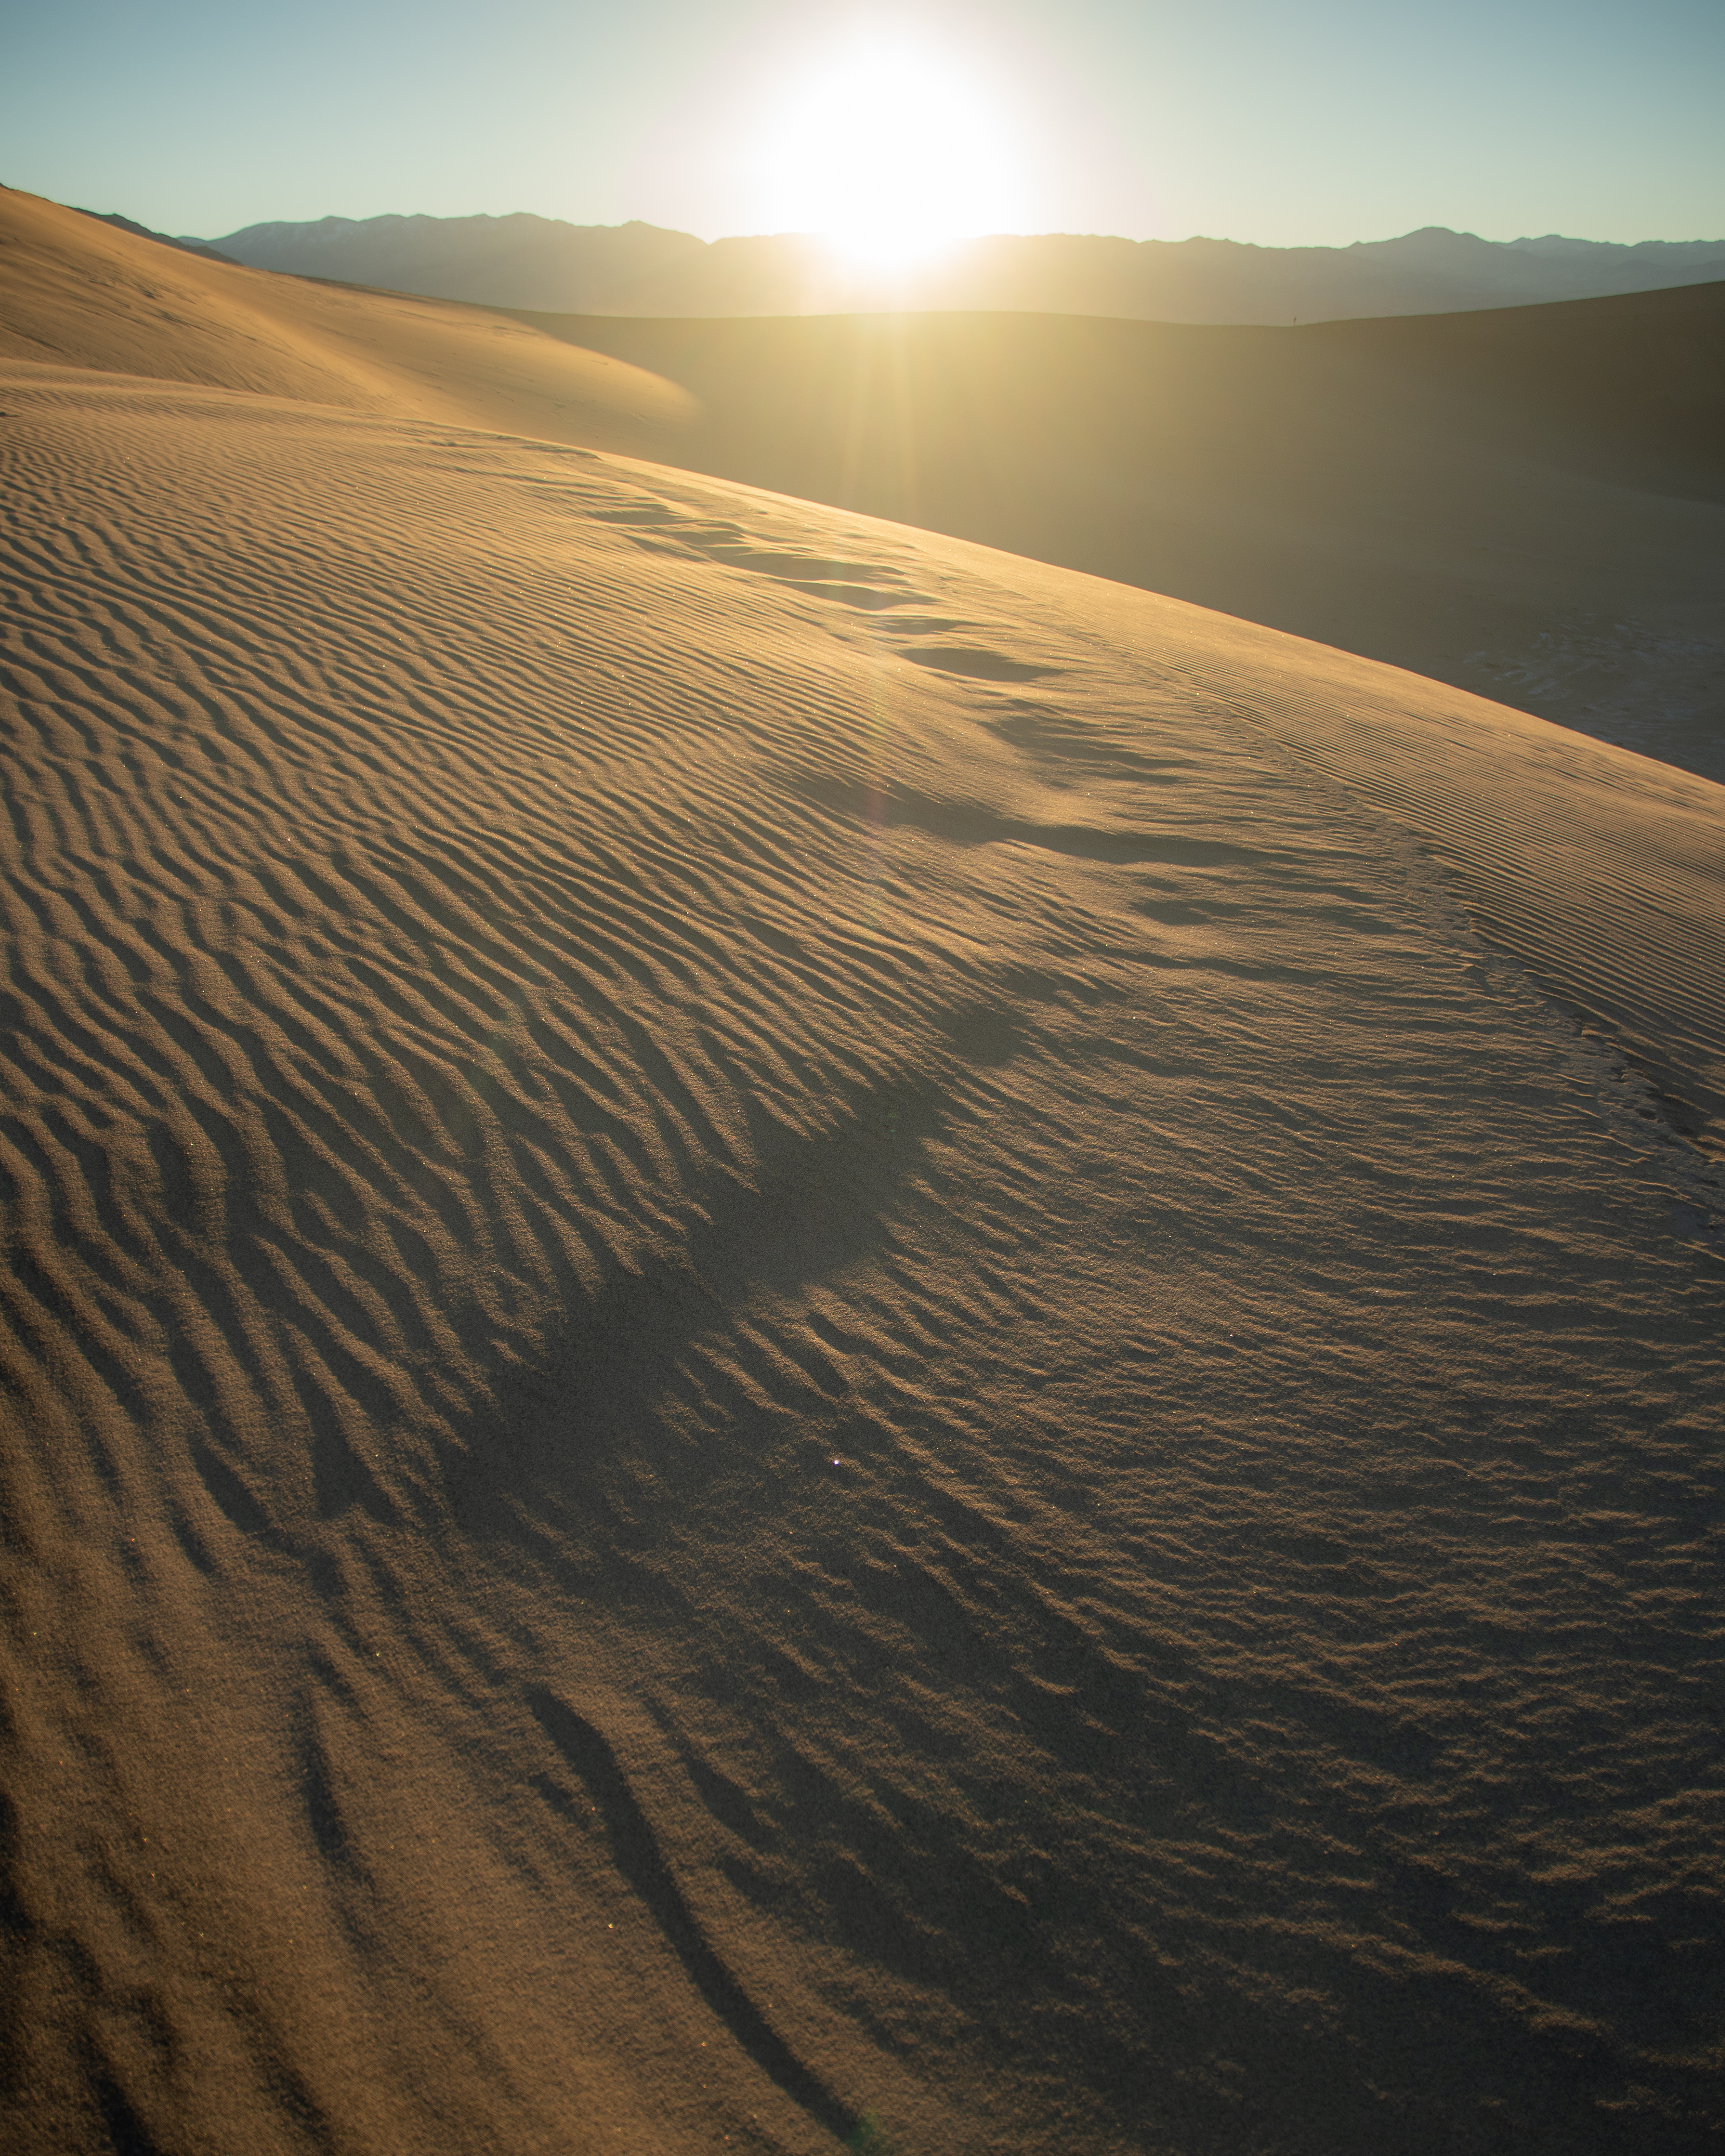
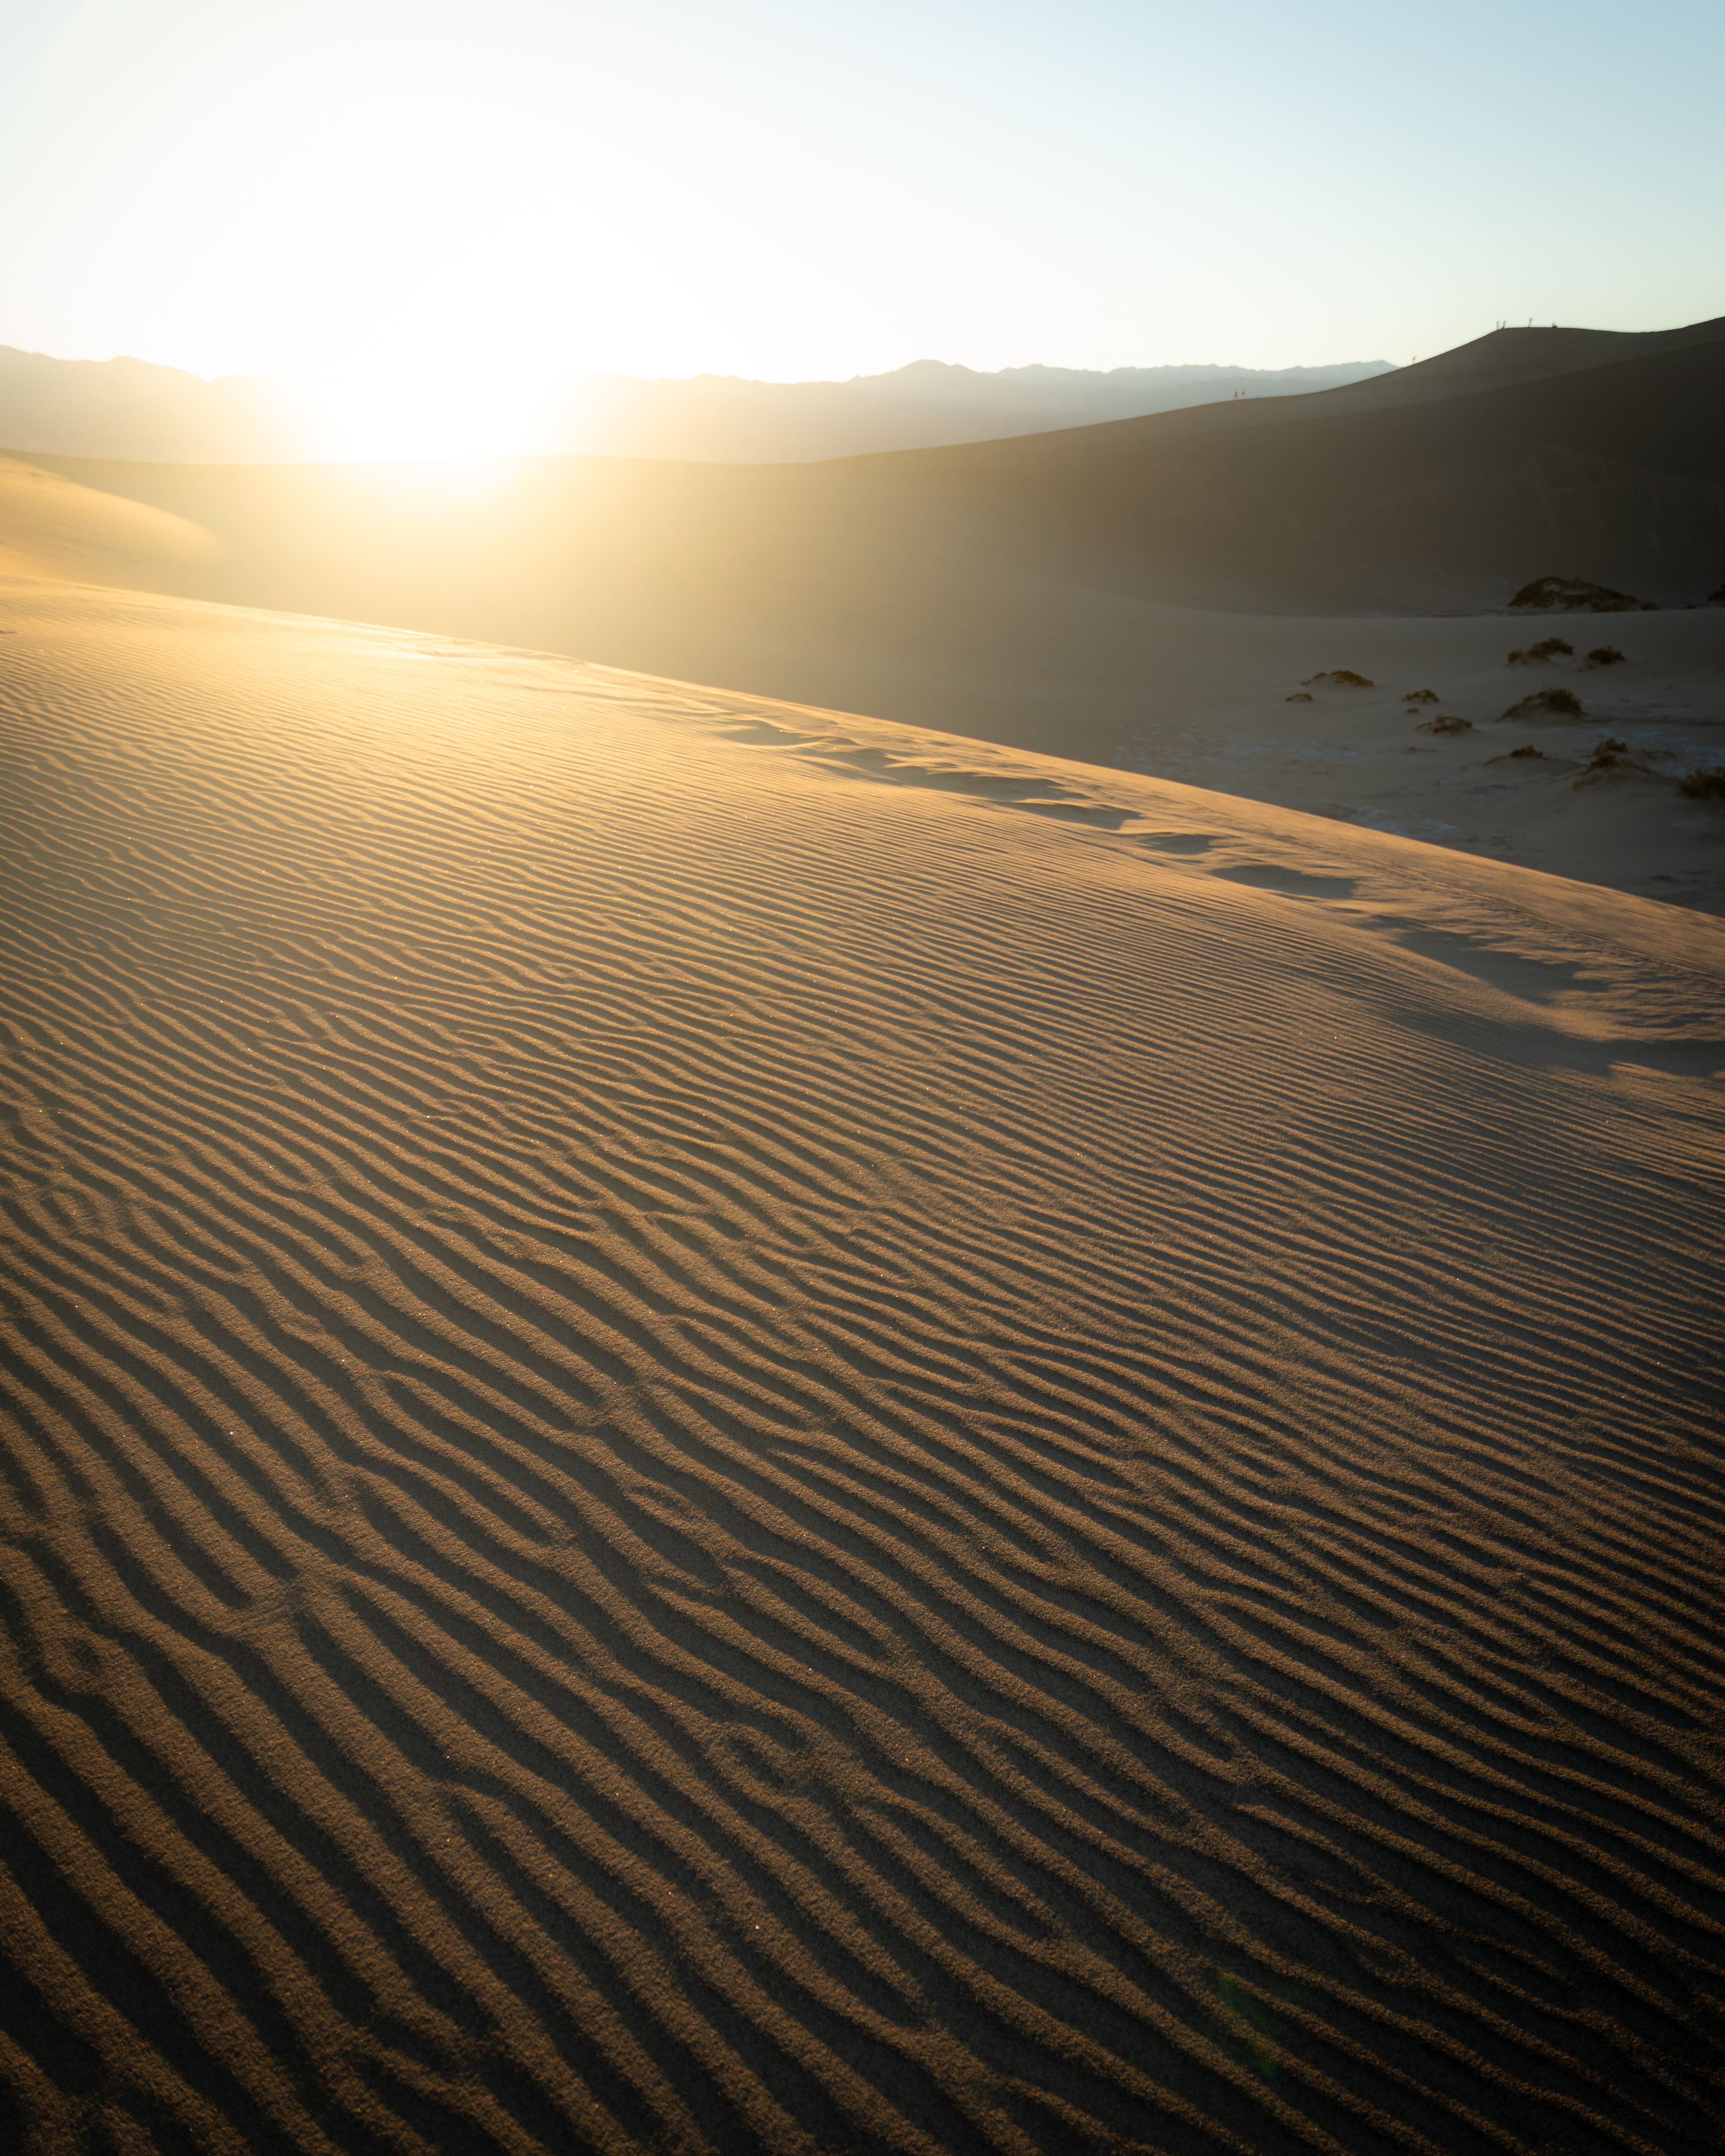
Mesquite Flat Sand Dunes

You can always find some good photo ops in the sand dunes, but you can also bring along your favorite sled or sand board and slide down these sandy hills, as many people were doing when I was there!

If you’re looking for a photo without any footprints and it has been a while since the last windstorm, you may have to hike around the dunes for quite some time to find a good spot! I walked all over the place before I finally found a small area that had not been disturbed. Even with that, I was unable to find a crest that didn’t have footprints.
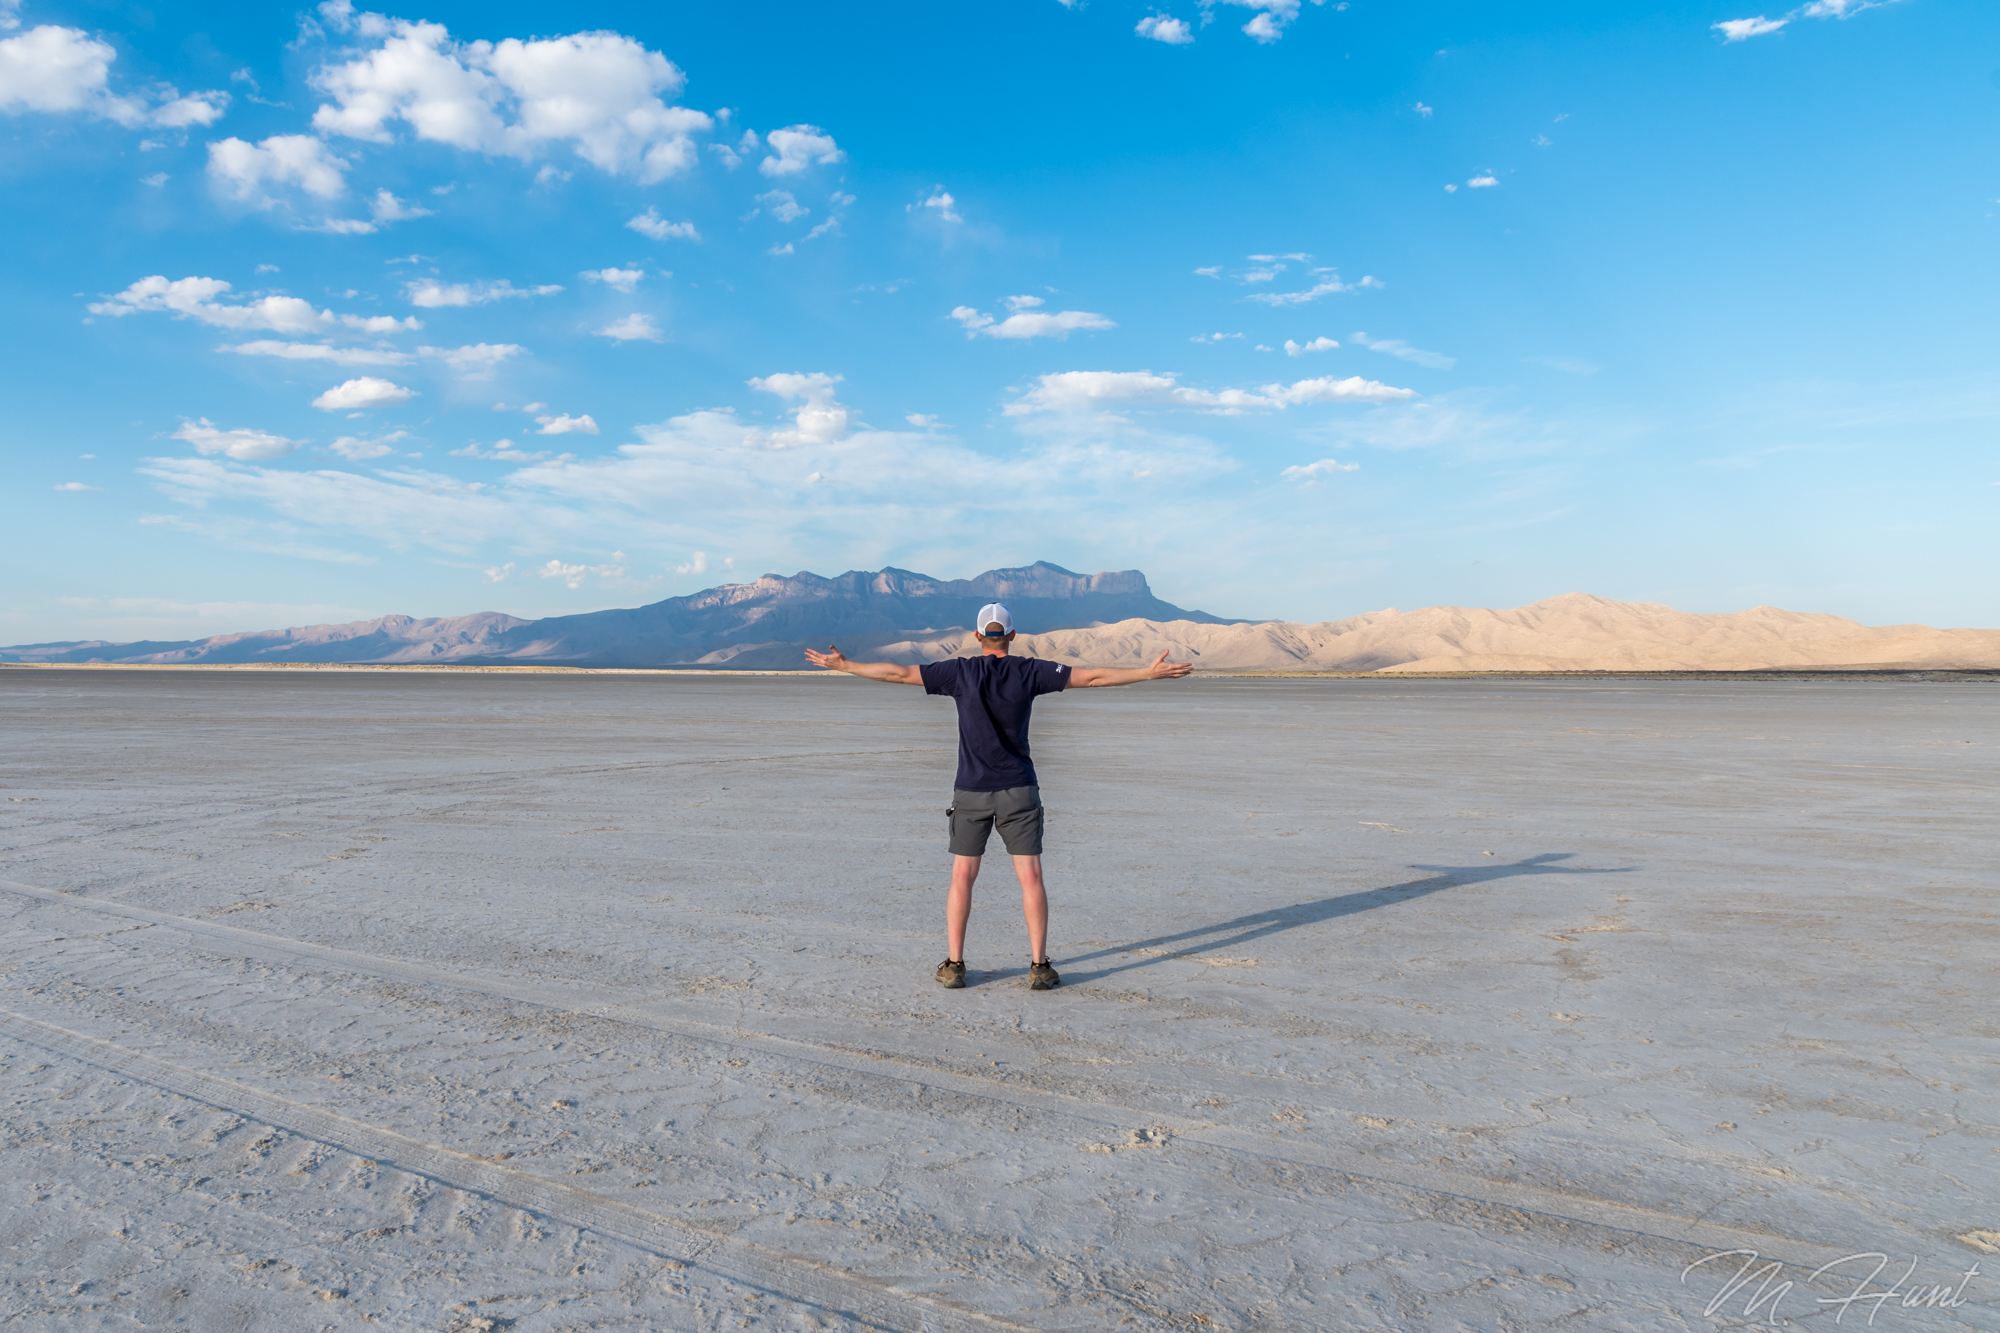
Badwater Basin

Want to go below sea level without getting wet? Come to Badwater Basin, located 282 feet below sea level! Look back at the cliff from the parking area and find the wood sign that marks sea level to see just how low you are.

No wonder it gets so hot here. In order for a place like this to exist (inland below sea level, and dry), you need an extremely dry climate. Only 2 inches of rain per year fall here on average.

The salt flat here is constantly changing as moisture comes and goes. Unfortunately for me, it wasn’t very photogenic when I was there. But if you time it right, and you’re willing to walk a ways out, you can get some good shots of the cracked salt plates.

Racetrack Playa

Unfortunately, I did not have time to visit the Racetrack, as it is about a 3.5 hour drive from the main park area, and I was only in the park for 24 hours. But if you have time, this is a unique place to visit.

At first glance it may seem like nothing special; just a dried up lake bed. But you will find rocks on the surface with a path etched in the dirt behind them, showing that the rocks have been moving! How do these rocks (some of them extremely heavy) move across a dried up lake bed?

Well, a recent study actually did figure out how this happens. There had been many theories, including hurricane force winds moving the rocks, but those proved to be wrong. A special set of conditions is required to move the rocks, and it doesn’t happen very often. First of all, there needs to be about 3 inches of water on the surface. Second, it needs to get cold enough to create a thin layer of ice on the surface overnight. The following day as the weather warms and the ice begins to melt and shift, it is actually the movement of these thin (but large) sheets of ice that push the rocks along the surface!

Next time I’m in Death Valley, the Racetrack will be at the top of my list!

When To Go

No doubt about this, you need to visit Death Valley in the winter months when it’s not so hot! You will find pleasant weather November through March. May through September the average highs top 100° with a peak of 116° in July (that’s the AVERAGE). I went in early January, and daytime highs were right around 70°.

Where To Stay

There are several campgrounds in the park, or if you want to spring for a hotel room, there are a couple options in Furnace Creek at the Oasis at Death Valley. There’s another hotel that may be a little cheaper in Stovepipe Wells. I opted to make the roughly 35 minute drive up to the Longstreet Inn & Casino just across the state line in Amargosa Valley, NV. Rooms here are a whole lot cheaper, but you’ll have to drive back and forth.

The Beauty of Southwest Utah

Note: As an Amazon Associate, I earn from qualified purchases made from affiliate links contained in this blog.

My first visit to southwest Utah came in April of 2016. I was on a road trip that included stops in New Mexico, Arizona and Utah. I came specifically to hike Angels Landing at Zion National Park. That remains to this day my favorite hike ever, and the view from the top was incredible!

DSC_9456

I even returned later that year in July for a trip that was focused solely on southern Utah. But that was all before I was into mountain biking. I continued to hear so many great things about the trails in this area near Zion. So with another delay in the start date of my new job, I decided to make the trip!

Problems Along the Way!

Things didn’t go exactly as planned, however! I had just passed through Salt Lake City when my car started acting strange. It felt like it was lunging. Could it be the road? No, it definitely wasn’t the road. I turned off cruise control, and when I pushed on the gas pedal, the engine just revved, and the car did not speed up! My transmission was finished!

I got a second Honda Accord primarily for reliability, so I never expected to have the transmission fail at only 65,000 miles! Well luckily, this was a Certified used car, which extends the warranty from 60,000 up to 100,000 miles. So I did not have to pay for the new transmission! But after doing some research, I learned that the CVT transmission they use in the Accord now is not very reliable. In fact, one transmission shop’s website said they rarely see them last more than 100,000 miles! Needless to say, it won’t be long before I trade this car in and get something that doesn’t have the piece of junk CVT transmission in it!

So while that ordeal didn’t cost me thousands of dollars to fix, it did mean that I had to push my trip back a week. But that was okay, because I still had time. So once it was fixed, I picked my car back up, and went on to Hurricane, UT from there.

How I Made This Trip Really Cheap!

Traveling can get expensive, especially if you want to do it often. Transportation and lodging are the two most expensive things, so how can you cut down on these? Driving is typically less expensive than flying, especially if you’re going somewhere that isn’t too far away. It’s just a little over 7 hours for me to get to Hurricane. Flying would not make sense. Gas costs less than $100 for the entire round trip.

To save on lodging, I camped in my car for free on public lands! In the western US, there is a lot of public land, and on most of it you can camp for free. Of course, there are no services like showers or bathrooms, but if you’re willing to rough it a bit, it’s a great option for free lodging!

Sleeping in your car doesn’t sound comfortable, does it? To be honest, it wasn’t that bad! I got a backseat air mattress, which is far more comfortable than just sleeping in the backseat, or laying the front seat down all the way! Obviously I cannot lie flat on my back completely stretched out, however, I often sleep on my side with my legs curled up anyway, and there is plenty of room for that. To try to keep some heat in, as well as give myself some privacy, I covered my windows with Reflectix insulation. It doesn’t keep the car warm all night, but I do feel that it keeps the warmth quite a bit longer than if it were not there!

Gooseberry Mesa

I spent my first night on top of Gooseberry Mesa surrounded by an incredibly beautiful landscape! I woke up to this:

DSC_8709

That day I rode the trails on Gooseberry Mesa, though I ended up cutting the ride fairly short due to the powerful winds! I was on the North Rim trail, and the winds just about blew me over on the exposed parts of the rim! The wind was out of the north, so it was at least not trying to blow me off the cliff, but I considered the risk of any fall there to not be worth it!

The trail was definitely unique, riding over rolling slickrock, similar to Moab, but with a different color. It’s like riding on the moon!

DSC_8792

Overall, however, it’s pretty slow going and requires a lot of pedaling. It’s not the style of trail that I find to be the most fun, but it’s a unique experience, and worth a visit. I know a lot of people really love it! The views from the north rim were spectacular, too!

DSC_8802

Guacamole Doesn’t Cost Extra

That night I drove up to the Whole Guacamole trailhead, where there are campsites in the immediate vicinity. I took a super cold shower outside in about mid-40’s temperatures with strong winds and cold water! Certainly not the hot shower I’m used to, but it was worth it to get cleaned up after the ride!

As the night wore on, the wind finally died down, and actually completely stopped. I remember waking up at one point when nature called, and noticing how completely silent it was outside! This is something I really love to experience, because our day-to-day lives in the city are filled with noise. We don’t always realize it, because we’re used to it. Which is what makes it even more amazing when you are in the middle of nowhere and experience true silence!

The ride on the Whole Guacamole was more fun than Gooseberry Mesa. Lots of technical challenges, more riding on the moon, as well as a little bit of flowy and faster downhill sections. This is also the closest trail to Zion National Park, so you’ve got great views on the entire ride! I would definitely recommend this one!

DSC_8824-Edit-2

Hurricane Rim

My final night was spent closer to the town of Hurricane, and right next to the Hurricane Rim trail. I rode straight from my campsite to the JEM trail, which then connected to Hurricane Rim.

This was easily my favorite ride of the trip! The climbs are tough & technical, the descents are fast & rowdy! I did not ride the entire trail since I had a 7+ hour drive back home immediately following, and I did not want to be driving late into the night. I only skipped about 2 miles on the west end of the trail, however, this is part of the trail that overlooks the town, and has the most elevation change. So I do want to get back down there sometime and ride that section!

DSC00771

The Highlights

Below is the video that I put together highlighting this trip! In the coming weeks I’ll be putting out the regular POV style videos of each ride, so stay tuned for those if you want to see more riding footage on these trails!

Big Bend

A couple weeks ago I took a crazy trip to Big Bend! Why was it crazy, you ask? Because Big Bend is a 9 hour drive, and I did it on a normal weekend.

I left work at 5 pm on Friday evening, and after fighting the DFW traffic & rain (which makes traffic about 8 gazillion times worse) I arrived in Terlingua at around 2:15 am. I “slept” in my car at a free campsite, waking before the sunrise.

I went out from there to take some photos and video, and then went mountain biking on the Dome Loop in Big Bend Ranch State Park.

DSC_2071

I met some great people in the parking lot of the visitor’s center, Danny & Darlene, and went biking with Danny, then hung out with them afterward in their Sprinter camper van. They have been traveling the country while living in the van for the past 11 months! I’m jealous!

That night I stayed at a legit campsite, which was amazing, and the moonlight lit up everything!

DSC_2254

After a much better (but chilly) night of sleep, I rose super early to make a 45 minute drive to Big Bend National Park to shoot the Milky Way.

DSC_2347-3

Sunday morning was the Lajitas Airport trails, and then the 9 hour drive back home!

Don’t let a lack of money or lack of time keep you from traveling. This trip cost roughly $100 (gas + $10 for the campsite) and didn’t require any PTO time. Yes, I spent 18 hours of my weekend driving, and far less than that sleeping, but you only get one life, so CARPE DIEM! The memories are worth far more than the time and the money spent.

The Top of Texas

I have an idea. Instead of just visiting all 50 states, why not summit the tallest peak in each of the 50 states? Sure, in some cases this is not that exciting, like in my birth state of Indiana, for example. The highest point of Indiana is just a spot you drive to and walk a short distance. Woo. But in the western states, there are actual mountains to climb, and how cool would it be to say I’ve reached the highest point in all 50 states?!

Whether I accomplish that or not, I could at least start with my current home state’s highest peak. That would be Guadalupe Peak located in Guadalupe Mountains National Park. This is actually one of the least visited National Parks in the country, ranking 48/59 in 2016 with 181,839 visitors (for comparison, the #1 park was Great Smoky Mountains with over 11 million!). Given its location, that does make some sense. In the middle of the Permian Basin, oil wells dominate the region, and there are no cities or even large towns nearby. There are no hotels within about an hour of the park, and the campgrounds are small. It’s just not an easy park to visit, especially if you plan on staying for more than a day or two.

For me it was about an 8 hour drive. In order to accomplish this over a weekend, I had to leave immediately following work on Friday evening, drive to Midland (about 5 hours) and stay the night, then get up early (I mean REALLY early; 4 am!) to complete the drive and begin the hike by sunrise. So that is what I did!

Preparation is the key to success. If I were to complete this hike, I’d definitely need plenty of fuel! Take a look at my selection of goodies!

DSC_9129

I started my hike just before 8 am. It’s 4.2 miles from the trailhead to the summit, with a gain in elevation of just over 3,000 feet to reach the summit at 8,749 feet above sea level. This park is known for its wind, so I had watched the weather for a while, and found a weekend with almost no wind. It was also pretty warm, so the long-sleeve shirt and jacket I had with me were not even needed.

Wildlife in this park includes black bears, mountain lions, and mule deer, among others. I didn’t see any bears or mountain lions, but I did run into a few mule deer. Two grown females, and three young ones, probably yearlings.

DSC_9178

They weren’t too sure about me, but they didn’t run away, either. I always love running into wildlife. Such a treat! Love these animals!

The first mile or mile and a half of this trail is the steepest. Good news and bad news, I guess. You certainly don’t ease into the hike, but on the plus side, you get the hardest part out of the way first. It also means the views get pretty spectacular pretty quickly.

You get a little bit of everything on this trail. There is some loose rock, some slick rock, open desert area, and pine forests. In the morning the trail starts in the sun, but then goes into the shade on the western slope, as the trail levels out somewhat. It’s a welcome break after that initial steep ascent in the sun.

Perhaps my recent increased activity level helped, or perhaps it was due in large part to frequent stops to take photos, but this hike ended up being less strenuous than I had anticipated. It took 3 hours and 15 minutes for me to reach the summit from the trailhead. Without all of the breaks, I think if I really pushed it I could do it in around 2 and a half hours.

There’s a big silver pyramid marking the summit, with a lock box containing a register. I signed the register, and took a break to eat a few Kashi bars, drink some water, and take some photos at the summit.

I’m well aware of the fact I’m not making any fashion statements with that outfit! But that was the only moisture-wicking shirt I had, and the shorts are actually convertible pants, which are very convenient when you’re not sure what the temperatures are going to be like.

Going up is your cardio workout, and coming back down is without a doubt your leg workout! My quads were burning by the last mile, and of course that would be the steepest part! It’s almost easier to jog down. I did not take any breaks on the way down, and it only took an hour and a half!

At that point I took the opportunity to get my entrance sign selfie, and then decided to head up to Carlsbad Caverns (about 45 minutes north).

I had originally planned on camping at the park and going to Carlsbad Caverns in the morning, but the campground was full. As it turned out, that was a very bad time to visit Carlsbad Caverns. It was absolutely packed, and I just didn’t have time to go through it all, so I was in and out, and did not see the most interesting sections. Oh well. I had to get to the next spot that I wanted to photograph, which was the salt flats! But first, I had to stop and get the iconic shot of El Capitan!

DSC_0021-HDR-Edit

Then it was off to the salt flats. I assumed it was okay to drive on them. There were no signs to tell me otherwise! There were also plenty of tire tracks, so out onto the flats I went. Pretty cool place!

DSC_0038

That would be a really great spot to shoot the sunrise. Maybe some other time. After that I made the drive to Prada Marfa. It is located in the middle of nowhere on US-90 in southwest Texas. No, it’s not an actual Prada store. It’s a sculpture by artists Elmgreen and Dragset. It’s not even in Marfa, it’s in Valentine. Marfa is another 26 miles to the southeast.

It originally contained actual Prada shoes and purses, but was vandalized 6 days after it was completed, and those items were stolen. They were then replaced with knock-offs.

DSC_0083

Since my camping plans were spoiled, I then decided to drive all the way to Odessa to stay in a hotel room for the night. I was completely exhausted by the time I got there, but it left me with just a little over a 5 hour drive on Sunday to get back home. So it was really a one-day adventure, lasting about 20 hours! Carpe diem!

Here is a vlog I put together on my hike to Guadalupe Peak. In the future I plan on either getting a dedicated camera for this, or at least a gimbal to stabilize the phone shots.

Hoodoo Magic

It was still dark outside as I approached Bryce Canyon National Park. I had left Hurricane, UT incredibly early in the morning so that I could get to the park before sunrise. I was carefully watching the clouds, as it appeared the sun was going to be blocked, and indeed it was at sunrise!

Although it was the middle of summer, Bryce is at a higher elevation, above 8,000 feet, and it was a brisk 52° that morning! I had not really packed for cooler weather, although I did have a light jacket with me. In spite of that, I was wearing shorts and flip flops, so it was a bit chilly!

The clouds did block the sun initially, but as I found out later on, I don’t think the sunlight would have hit many of the hoodoos early on. Even after it peaked the clouds, I had to wait several more minutes before it really started to light up the whole amphitheater.

dsc_2414-2

Bryce is a magical place, and seems like another planet! How do these crazy rock formations even happen?! The hoodoos are formed by a couple of environmental factors. One is a process known as frost wedging. This area has over 200 freezing/thawing cycles each year. Snow melts, resulting in water seeping into the cracks, and then re-freezing overnight. As we all know (or should know if we paid attention in science class), water expands when it freezes. This slowly erodes the sedimentary rock, forming holes, and later these individual spires.

Rain also plays a role in the hoodoo formation. Its slightly acidic nature slowly dissolves the limestone. Different mineral deposits in the layers of the rock result in the different colors, appearing as stripes, as well as the shapes, as some layers are formed of harder rock than others. New hoodoos continue to form as old ones crumble to the ground, so it’s likely this area will look like this for many, many years to come.

The above photo (probably my favorite, and hanging on my wall!) was taken from Inspiration Point. This is the area in the park with the most dense concentration of hoodoos, and is probably one of the most photographed. Another popular spot is around one particular hoodoo that has been named Thor’s Hammer. That was my next stop.

The sunlight bouncing off the orange walls was creating this incredible glow in this area! This is a must if you visit Bryce. You have to get out of bed early, because the morning light is the best this place looks all day!

It was here that I blew a golden opportunity that shows you why I’m still single! I had a very attractive young lady approach me and ask me to take her picture. Based on her accent, she was not American, and based on the lack of anyone else with her, she was traveling alone. Of course I’m not a one-night-stand guy, and this likely would not have led to any long-term relationship, but hey you never know. Regardless, I had wished I would have kept her in my presence at least a few minutes longer and struck up a conversation, but instead I just went back to shooting pictures of my own. Idiot.

dsc_2576-hdr

As the sun got higher, the pictures were not as great, so I decided to grab some lunch. When I got back to the park I decided to drive further in and check out some of the other overlooks.

Man… that drive was awesome. It was beautiful out there, with temps in the mid-70’s and no humidity to speak of! I put the windows down and opened up the sunroof and enjoyed the fresh air as I cruised through the pine forest. It may be a bit odd, but this was one of those moments that truly stuck out to me. The feeling at that time of not a care in the world, no worries about work, or bills, or anything. Just enjoying the present. I need more moments like that in my life!

dsc_2701

This is definitely when I’m at my happiest. They do not lie when they tell you that travel changes you. It sure has changed me. There’s no place I’d rather be than any place I’ve never been before!

dsc_2720

I did have to battle with some rain showers passing over the park, as you can see a little in the top left corner of the photo above. Out of the frame there’s a big dark cloud there! In fact there was even some tiny pieces of hail falling! I imagine that’s mostly due to the elevation, not the strength of the updraft for this little storm.

One of the stops I had to make was another often photographed feature of the park called Natural Bridge. This is a huge arch, and I didn’t realize that there’s a parking lot and overlook right there at it! I initially thought it would be a bit of a hike based on the park map. I bet this would be a great place to be in the morning as well, with some of the light bouncing off the cliff and back onto the arch.

dsc_2739

After that I got some ice cream (I’m on vacation, I do what I want), checked into my room in the nearby town of Panguitch, and came back to the park after dinner. I didn’t know if there would be much of an opportunity for any good photos at sunset since the cliffs face east, and the sun is pretty much completely blocked from this area in the evening.

Of course I had to do my signature selfie first…

dsc_2845

I had some indecision on where to set up for the sunset, as I was watching some high clouds rolling in, and thought they just might light up after the sun went down. No such luck, but this shot turned out pretty good!

dsc_2907

I stayed at the park after dark, and went back to Thor’s Hammer for some milky way shots! This is the time that is pretty boring, between sunset and the milky way becoming visible. It was about an hour and a half with literally nothing to do. I just stood there by my camera. Ha! I don’t know the stars very well, but I’ve come to recognize a triangle of bright stars that show me where the milky way will be. Of course you have to account for the rotation of the Earth, but it gives me a pretty good idea of how to set up well before it’s dark out.

I decided to try something I’ve never done successfully… take a panorama of the entire milky way. It is quite a challenge, because the Earth’s rotation means those stars are not stagnant, you’re shooting long exposures, and it took 9 vertical shots to complete the entire pano. What helps tremendously is the degree markings on my tripod. I know that if I turn it 15° (or was it 10°?) I’ll have enough overlap between pictures for it to stitch together in Lightroom. And finally, I got it to work!

dsc_2993-pano

I actually tried to do longer exposures for the foreground and make a composite, but for some reason it would never line up. Something may have been off with the lens correction, though I tried making the pano before and after applying a lens correction, and it still didn’t line up. Oh well, this shot works. If you’re in a dark room, you can see the details and see Thor’s Hammer in the middle of the photo.

That wasn’t the only milky way shot I had planned, however! The park entrance faces south, so the sign has the milky way behind it! I’m not sure if this is possible at any other National Park. I know this is the only park I’ve seen photos of it done.

That shot proved to be difficult simply because of all of the traffic going by as people exited the park! The headlights were way too bright, and ruined the photo repeatedly. I finally got a shot where the car was still well off in the distance, and it lit up some of the trees nicely along the road. I used two exposures here so that I could use a low ISO on the sign, and not have any noise at all! That was very simple to blend using layers in Photoshop and setting that layer to “lighten”.

dsc_3023-edit

Even though Bryce Canyon is a relatively small park, there is still a lot of it that I didn’t have time to explore! I didn’t do any hiking at all, so that is one thing I’d like to do if I ever return. What am I saying… WHEN I return! I’d also like to come back in the winter and get some shots of the hoodoos draped in a bed of fresh snow!

I hope you enjoyed these pictures, and I hope you’re now considering a visit to Bryce Canyon! You definitely won’t regret it!

Delicate Arch: A Utah Landmark

On my trip through the National Parks of southern Utah, there was one shot in particular that I was after. I wanted to get a shot of the milky way through Delicate Arch. Delicate Arch is symbolic of Utah; in fact it appears on their license plate. Formed of Entrada Sandstone, the arch opening stands 64 feet tall and 45 feet wide. It is the largest free-standing arch in Arches National Park.

Delicate Arch is not one that cannot be driven right up to and seen with a short walk. It requires a fairly strenuous hike of 3 miles round trip, with a 480 foot elevation gain. In the summer heat, this is made even more strenuous, and there isn’t a whole lot of shade along the trail! Since I wanted to be there for sunset as well, I completed this hike at probably the worst possible time of day, the late-afternoon, when it was well in excess of 100 degrees! The sign at the beginning of the trail recommends bringing 2 liters of water with you for this hike. I had finished off 1 liter by the time I reached the top.

Once I was at the top, however, I was able to sit in the shade and cool down, and it wasn’t bad at all. That’s the advantage of the dry heat! In spite of the heat and the relatively demanding hike, it was pretty crowded up there, but I fully expected that.

Even with the crowds, you can get a good angle on the arch from several different spots, so it’s not really an issue. The biggest issue is that everyone and their mother wants to get a picture of themselves standing underneath the arch! There was actually a line, and one at a time they’d walk out, take a few pictures, then the next person or group would come in.

Once the sun began to get lower in the sky, however, there was one brave photographer who yelled across the way for those people to clear the arch and give everyone 10 seconds for a clear shot!

dsc_3139

This is another one of the top shots I was after on this trip, and one that had been two years in the making, ever since I was originally set to spend 4 weeks in Grand Junction, CO, just 2 hours away. The only thing that would make it better is if the La Sal Mountains had snow on the peaks! I guess I’ll just have to go back in the early spring to get that shot!

Later on as the shadows were creeping up on the arch, and the light at the top of the arch was even more brilliant, I took it upon myself to yell across the way and ask for another 10 seconds to shoot!

dsc_3182

You see the difference in the color there as the sun gets lower, and the light turns to a more brilliant orange. I just wish the arch was sitting a little higher, or there wasn’t anything blocking the sun at the bottom of it at this point. Nonetheless, that was quite a beautiful moment, and in this scenario, a completely cloud-free sky was another thing I had been hoping for.

The lack of clouds was absolute requirement after the sun set if I were to get the #1 shot I came for with the milky way! After the sun went down, the crowd slowly started to die down, and for a moment I thought it would just be myself and one other photographer there to shoot the milky way, but by the time darkness had set in, half a dozen or more photographers showed up.

To get this shot, I had planned on doing two separate exposures. One for the milky way itself, with a high ISO to take in more light. I then wanted to do a separate exposure for the arch at a lower ISO for less noise, lit by my flashlight. I made sure the other photographers were okay with me light painting for a couple minutes, because I was still doing a long exposure for this. If you light paint on a high ISO, you really only need a flash.

Back on the computer, I combined the two images in Photoshop. Since I’m not that skilled with the various methods of cutting parts of layers out, I did this all by hand when zoomed way in. In addition, my camera creates this odd noise on long exposures with these little purple, red, blue and yellow lines. I went through all the dark spots on the foreground with the spot removal tool and took literally thousands of these little specs out by hand! This one image has about 4 hours of labor in it, but the end result was well worth it!

dsc_3283-4

Want a print of this image? Visit my Etsy store to order! I got an 18 x 24 inch canvas of this printed for my wall at home, and it looks great! Just contact me if you want to order any other images that are not in my current inventory on Etsy!

dsc_4289

The Narrows

Ahhh, it sure was good to be back at Zion National Park! This is without a doubt one of my favorite places, even though I had previously spent all of one day there! After a long drive out from Dallas, I had spent the previous night in nearby Kanab, UT, about an hour away. I arrived at Zion relatively early in the morning, and planned on heading to the last stop on the shuttle, the Temple of Sinawava, which was where The Narrows hike began.

Before I got through the east end of the park, however, I ran into a huge group of bighorn sheep, so I had to stop and take some photos! I originally only saw one standing on top of a rock, so I turned around, and by the time I got back in that area several cars had stopped, and I noticed quite a few. Then more showed up. Then more showed up! They were all females with the exception of one male ram. Of course I focused on snapping pictures of him, because those big horns (hence the name) are pretty impressive!

This has to be one of my favorite animals. And sure, you can see bighorns and other animals in an enclosed space, like a safari drive, but there’s just something so much more magical about seeing them out in the wild. Obviously these animals have been around for a long time, as they can be seen in petroglyphs throughout this area of southern Utah. What a magical creature!

Moving on through the park, I got to the visitor’s center and got my bag put together and caught the shuttle. It takes quite a while to get all the way to the final stop in the canyon. I’d recommend getting there much earlier than I did, and catching the very first shuttle out. I had to wait in line for a while just to get on the shuttle. It was mid-morning, I forget what time, but this seems to be the busiest time of day for the park shuttle.

The trail starts on the Riverside Walk, which is a well-maintained path, so that part is easy. This goes for about a half-mile I believe. Where this ends, it’s time to go straight into the Virgin River! I purchased a pair of water shoes with a pretty thick sole on them a few days prior to leaving, however I was never able to find any neoprene socks. I noticed that many others had the same shoes on, with sizes noted by markers. They were rentals. I should have done more research! Those shoes (and socks) looked legit, and much better than my $25 water shoes. As it would turn out, I really could have used those! The insoles in my shoes came loose, and were shifting all around inside the shoe, and rubbing against my feet. I ended up with skin scraped off in four different areas, two on each feet. The most problematic of them all were on the inside “corner”, if you will, of each foot right at the ball of the foot. This spot on the right foot in particular would end up being an issue for the entire duration of the trip! So if you do the Zion Narrows hike, be sure you are properly outfitted for it! I’d recommend using one of the local outfitters to rent those shoes. I couldn’t tell you which one those people got them from, but I’m sure a little research would reveal that!

DSC_1782

At any rate, I’m not sure how far out I went, but I hiked for about 3 hours before deciding to turn around and come back. The water was never even waist deep, and most of the time was only ankle deep. In this 100-degree weather, it was much more pleasant hiking in the mostly shaded, cool waters of the Virgin River! I heard one guy saying you could go as far as 14 or 15 miles down the river if you are so inclined. Obviously I didn’t go quite that far! But it’s a good hike for the family, and you can make it as long or as short as you want.

As far as a photography standpoint, well that was tough. The river was absolutely packed with people, so I had a hard time finding spots where I could get a clear shot. On many occasions, just as I thought I had a clear shot, a group of 10-15 more people would start hiking through. At one point right after I had set up my tripod, this kid literally sat down RIGHT in front of my camera. Ugh, really kid?! I just glared at him, and after a minute or so he started moving out of the frame. I’m sure it wouldn’t be so packed during the cooler months, but at those times a wet suit may not be a bad idea!

Enough words, on to the photos! Contact me for prints or canvases of any of these photos!

DSC_1811DSC_1872DSC_1834-EditDSC_1821

The Grand Canyon

Tuesday April 12, 2016. This was a significant day. Not just because I had three stops (Grand Canyon, Antelope Canyon, Horseshoe Bend), but because on this day 23 years prior my father passed away from cancer. It’s hard to believe it has been that long.

I got an early start out of Flagstaff, because I wanted to be at the Grand Canyon by sunrise. I didn’t have much time, since I needed to be in Page for my Antelope Canyon tour by 11 am. More on that later…

It was freezing that morning. Literally freezing. The temperature was 32 degrees when I woke up in Flagstaff. That scent of the Ponderosa Pine was in the air as I loaded my bags back into my car and hit the road. It was an easy drive through mostly flat grasslands, and more Ponderosa Pine forests, which became more prominent as I approached the park.

While cruising along, I saw something unexpected. There was a bull elk, grazing right along the side of the road! I had to stop and take pictures, of course! I quickly put my telephoto lens on and went to work.

DSC_8645

Gosh, what a beautiful animal. There were actually two of them, but this one was closer to the road. The other one was further back into the woods, and I couldn’t get a clear shot. I snapped a lot of pictures, and also spent some time just admiring this majestic creature. I only wish they had their full antlers!

As they both ventured further into the woods, I decided to move along, but I didn’t get very far before spotting another elk on the other side of the road! I pulled over and snapped some more photos!

DSC_8671

By this time the sun was already rising, so I continued into the park. I didn’t have to pay, because I had my America The Beautiful Pass! If you’re planning on visiting 3 or more National Parks in a year, this pass will pay for itself. I was doing just that on this trip alone, and planning two more trips this year that will take me through another half a dozen or so parks, so this pass is more than worth it to me!

So I got into the park and headed out to the overlook, where I was greeted by the first light hitting the cliffs on the west end of the canyon.

DSC_8727

Oh. My. Gosh. I was absolutely floored by the sight of this place! Of course I had seen plenty of pictures, but seeing it in person was something else. I immediately realized that no picture could ever do this place justice. It is simply stunning. It is massive. It makes you feel small, as well as grateful to live on such a beautiful planet!

DSC_8793

I spent some time walking along the trail on the canyon rim, just looking for good spots to stop and take photos. I was looking for any kind of foreground interest to add to all of that wide open space on the horizon.

DSC_8770

While I wasn’t doing anything as risky as I saw others doing, I did get out on some ledges. You feel more alive when you are closer to death! There are no railings along this trail, and one wrong step would be the end of your story with such a steep, and long drop to the canyon floor below.

DSC_8775

That picture describes my feeling perfectly. How can you not love it? How can you not look out over this massive canyon and feel like the world is yours? The world is yours… to explore! Why would you ever want to just stay in the same place forever with all of this beauty out there?

DSC_8813

After the above picture I decided it was time to move along to another lookout point. When I got to my car I punched in the address in Page that I was heading to (where I needed to be by 11 am, remember?), and it said my arrival time would be… 11:02 am! Oh no! I had to go!

If you know anything about time zones, you know that Arizona has its own time zone. They do not participate in daylight savings time. Utah is on a different time than Arizona, even though it’s in the same latitude. Page is just south of the state line, very close to Utah. So when I got to the Antelope Canyon tour place, the lady said she’d go ahead and check me in, but it was only 10 am. Oh no! I could have spent another hour at the Grand Canyon!

That was my biggest regret that morning. So if you’re going to be in this area, and you’re going to be doing things that require punctuality, make sure you know before you go about the time zones, and don’t rely on your phone or GPS to give you an accurate time!

I guess that just means I’ll have to go back to the Grand Canyon again! Really, I would recommend you spend far more than an hour there when you go. I would at least dedicate a whole day, so that you can see the sunrise and the sunset.